Saturday, March 5, 2022

Thrift Store Finds (Yashica T4)

Being successful at thrift store shopping, you should have the habit of visiting such stores on a regular basis. Lately, I got a lot of very interesting photographic equipment from my local store. Today might have just been the best yet. For just €1.95, I got myself a copy of the legendary Yashica T4 in mint condition. The camera is untested up to know. I first will have to shoot the film in yet another thrift store find, so that I can move the battery between the cameras.

Yashica T4 front

Yashica T4, what I paid for

Presently, this is a $500 camera.

In reverse or random order, I might post more of my finds in such stores in the future. Hopefully with images from and taken with said finds. 


Friday, July 16, 2021

I missed somthing, the Huawei P10

The regular reader might remember that I was quite positive about the camera of the Huawei P9, in particular what the monochrome part was concerned. Well, I still stand by that opinion, no questions asked.

Meanwhile I purchased at Huawei P20 pro. The reason being that this was the last phone with a true monochrome camera. And... it did not disappoint.  However, this is a rather large device, so the carrying in a pocket experience was not that good. 

For a reason you don't want to know, I yet bough again a camera, i.e. a Huawei P10. The P10 is again one of this phones having a monochrome camera, the thing I am so keen about.

The Huawei P10 offers a camera that delivers essentially everything one needs. This, while having the size of the Huawei P9. What I am mainly crazed about is the 20MP monochrome images.  The P9 does not provide that resolution while the P20 pro is a lot bigger.

If you are looking for a compact 20MP monochrome camera, the Huawei P10 is your device.


Monday, May 11, 2020

Jsolette Green Sticky Stuff

Some Jsolettes, most actually, suffer from sticky (green) lubricant. This might mainly be a problem with the focus thread but also can affect the shutter at slower shutter speeds.

The fix for the focus thread is pretty simple. You slowly warm the camera up, not hot, just to the touch. This makes the sticky green stuff somewhat softer. Now you want to turn the focus ring back a forth with mild force. If possible, move it all the way to close focus. Now apply some lighter fluid to the threads, this is a solvent that is compatible with optics. I use the one by Zippo with great success. Use gloves if you don’t want temporary white skin. Now move the focus thread in and out, re-apply lighter fluid if needed. Some stickiness will remain, which is a good thing for the focus ring.

If the shutter times are not OK, the process gets a little bit more involved. Now you will have to remove the lens/shutter-assembly from the camera. You will need a lens spanner to remove the retaining ring on the inside of the camera. It is easiest to first fold the camera, loosen the ring (be careful to not damage the bellows). Unfold the camera and remove the retaining ring. The lens assembly will now pop out to the front.
Similar to large format lenses, the lens consists of a front lens group and a back lens group which are screwed into the shutter.
Unscrew both lens groups. The front ground has to a little stop which needs removal first. This provides the chance of giving those groups a good clean (do not use circular motion at all costs!); lighter fluid is a good solvent for that job.
Speaking of lighter fluid, now it is time to give the shutter/iris assembly a good bath in the same. In problem cases, I washed the assembly in hot water first and when still hot, give it a lighter fluid bath. This will remove all lubrication, which is not good either. Once the iris blades and the gears of the shutter are no longer sticky, dry everything as quickly as possible. We don’t want rust to build up. I now tend to apply small portions of petroleum jelly to the gears (not the aperture blades!). Heat is your friend to distribute the petroleum jelly while moving the mechanisms.

When putting it all together, care should be taken to put the front group in the exact same thread as before. The focus worm has 3 threads. Get the wrong one and all photos will be out of focus. I got that wrong once and found myself with 12 out-of-focus negatives once. With an open shutter, a defined short distance to a bright light source and some parchment paper would will be able to find the correct thread should things have gone wrong.

Friday, October 4, 2019

Huawei P20 pro "Aperture mode"

While the P9 was already equipped with an synthetic aperture more, i.e. blurring the background, effectively, I never used it. With the P9 I shot either in RAW or in monochrome, for which the aperture mode is not available.

In the P20 pro, RAW is still RAW, the image information as recorded by the sensor, things have changed for the monochrome camera. Unfortunately, there is still no RAW data available from the monochrome sensor.

However, next the normal and pro modes, which were already known from the P9, Huawei added the aperture and portrait modes to the monochrome camera.
I have yet to experiment with the portrait mode.

The aperture mode provides some nice results in monochrome.
simple solid object

However, since this is all synthetic and merely based on triangulation of the distance, the algorithm does not handle reflections properly.
reflections on water
As you can see in the image above, curtain in the background is totally blurred, i.e. out of focus, while the reflection on the water surface, the curtain is in focus.

Therefore, when using artificial aperture mode, it is advisable to avoid reflective surfaces.

Tuesday, October 1, 2019

The last of its kind

The first and the last, I got!
you might wonder what I write about...
The first and the last smart phone with a pure and honest monochrome camera.
Some years ago, I purchased the Huawei P9, on which some posts are available here. The P9 was my phone ever since. Some coincidence had me looking into yet a more modern smart phone. Again, my preference was to have a monochrome camera available.
It seems, the Huawei P20 pro and P20 mate are the last generation smartphones employing a true monochrome sensor.
Consequently, I got a Huawei P20 pro (less expensive than the P20 mate).
Up to now, I am not convinced if the P20 pro is superior to the P9. I found some pros and cons on both.
Stay tuned, I will do some testing and comparing both phones in the near future.

Tuesday, July 23, 2019

China Ball update

The original China Ball illumination is omni-directional, unless used with a black screen. When using a China ball as a somewhat shine-through umbrella replacement, we wish to add some sort of directivity to the light-source.

The frame of the China ball helps a great deal. Aluminum foil can be fixed to the frame to re-direct light to the "front" of the ball.

Simple reflector for the light-source in a China ball 

Sunday, July 21, 2019

China Ball studio light

Lately some brainstorming with a friend lead us to improvise portable China Ball lighting for a small vlogging setup on the cheap, after having discussed the use of lighting stands and soft-boxes.

The basic idea is to use materials as inexpensive and in-obstructive as possible. While hanging China Balls might be the obvious choice, however, this means that the lighting setup is not really portable.
We came to the conclusion that a suitable floor lamp would be able to hold a China Ball in a decent height, enough for a desk to be illuminated with a soft key light.
A first choice fell on an IKEA product called NOT.

The next problem to be solved was to mount a China ball to the lamp, such that the light source is essentially in the center of the ball, while the ball remains easily removable.
Household grade China balls are usually hung with little eyes on hooks.
Collapsed China Ball as seen from top, note the eyes to the right and the left
Having a ball mounted on a stand, it needs to be mounted upside down.

Your regular household China ball comes with a steel wire frame to suspend the ball from the electrical wire. This employs some sort of clamping mechanism. With a little bit of pliers work, this clamp can be re-purposed as a lower stabilizer. Have a look:


Only one of the two arms is used, the other is bent out of the way

This is how the frame engages with the post of the floor lamp

The frame of a China ball is created by welding two rods together. This creates a very small lip in the middle of the frame. Here this lip is arranged to abut with the metal cone of the lamp housing.
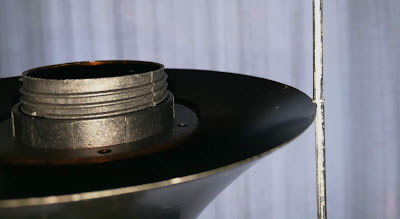
Weld of the frame rests on housing cone
To fix it all, gaffers' tape can be used. For better visibility, white gaffers' tape is used for demonstration.


Needless to say that in this setup, the China Ball is mounted from the top and clipped in to the little hooks on the lower end of the frame (*).

Top of the China Ball


Gravity holds the lower end down.

Bottom of the China Ball


In this example, a 90cm China Ball was used. Seen the flimsy wire holding it all up, a somewhat lighter, i.e. smaller, ball should be used. Inside the ball, there is a TRADFRI bulb installed. For the following photo, the color temperature of the bulb was set to warm in order to form a contrast to the bright blue sky shining through the curtains.

NOT and TRADFRI standing China Ball

(*) Clipping the hooks into the eyes creates tension in the frame and slightly deforms the frame. By doing so, the stability of the frame is compromised. During the first attempt, the ball was clipped to the frame. It turned out to not only be unnecessary, but also detrimental to the setup.

Just as a final remark, NOT, as it comes, provides a maximum height. Using less segments will provide a lower light height. Using more segments, e.g. from a second NOT, could increase the height. The latter option should be taken with great care to stability of the stand. Maybe adding some weight on the food for added stability.