Tuesday, July 22, 2025

Acros and Kodachrome on the Camp Snap

In my last post, I layed out a way on how to getting a film simulation on the Camp Snap (v105).
Today, I want to discuss some of the results. By now, I own 2 Camp Snaps, for the reason of having one equipped with a B&W film simulation and the other one with a colour film simulation. 

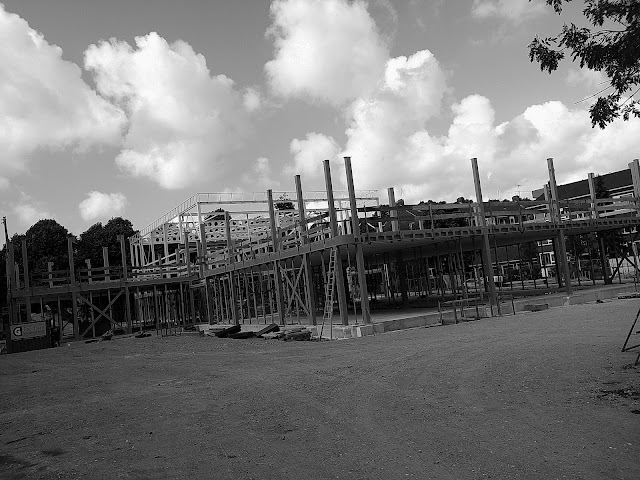
The following considerations are along a rather contrasty scene, taken in the late afternoon. Both were taken with cameras side-by-side, overhead to avoid the fence to interfere. Sorry for the tilt, it is what it is, straight out of cameras.

Kodachrome 25 film simulation

Acros 100 film simulation

At first sight, both images look pretty decent in terms of contrast and detail. However, there is a catch...

Let's look at some details.


Crop and resize

I am sorry for not having hit the exact same crop. I think they are close enough for what I want to demonstrate here. 
The Colour image, looks somewhat weird due to the camera's over-sharpening. See the halos about the dark structures? I guess one can noise-filter / smooth those out in post. However, post is not the aim original of the Camp Snap.

Let's have a closer look at the Acros film simulation. For some reason, at least to me, this looks a lot more natural, i.e. filmish like.
When developing B&W-film, I usually use a semi-stand technique in order to boost edge contrast. Somehow, the over-sharpening of the Camp Snap created this very effect. 
Another feature of the Acros image, the noise! Isn't that lovely film grain? I love it!

Maybe, just maybe, the Camp Snap with a B&W-film simulation is the perfect poor man's Leica monochrome.


Sunday, July 20, 2025

Fujifilm Acros 100, Ilford PanF+50 or Kodak Kodachrom 25 on the Camp Snap

None of this is any of my own ideas, I just compiling things which seem to work for me.
I use either Linux or ChromeOS as my main operation systems. The following will be available on Linux, maybe on ChromeOS with the Linux extension (not tested).

In RawTherapee film simulations can be applied to images using look-up-tables know as HaldCLUT. So far so good, we have all been using this once and a while, I guess. I you have not done this before, be aware that you need to point to a HaldCLUT-directory in the RawTherapee settings.

Would it not be nice if the camera can apply such simulations right away? Yes, of course, the Fujifilm range of premium cameras can do this.
What if I told you, the $70 Camp Snap can do that too?

Here is how to do it with the help of Turtle Bard's webpage Camper Snapper.
In essence, just follow the instructions. 

  • download the Ramp.png file
  • open the Ramp.png file in RawTherapee
  • apply the desired film simulations (there are plenty of those in the HaldCLUT)
  • save a 8 bit-png with an adequate name
  • upload your file to Camper Snapper
  • download the flt-file for the Camp Snap
Optionally, you can use Camp Snap's filter webpage to check the effect of the flt-file, without using your camera.

As I mentioned previously, the SD-card of my Camp Snap has a directory for those "filters". On the move, I can use my (cable connected) smartphone to delete the flt-file in the root-directory and copy a desired filter-file from my filter-directory to the root-directory.

Here you have it, a very simple method to get film simulations and Fujifilm Acros, Ilford PanF or Kodachrome on your $70 Camp Snap.

As a tip: you can dive deep into RawTherapee and apply various colour-filters to your BW-conversion as well. Once you got the hang of RawTherapee, there are no limits to creating jpeg-profiles for the Camp Snap camera.
Just remember it is a $70 camera and cannot compete with a Fujifilm X100VI.

Acros simulation with LED-flash --- tree in front of my home

same as above, different part of the tree though

Kodachrome

Kodachrome


Friday, July 18, 2025

Camp Snap flat jpeg profile

In the hope that blogger does not "improve" anything in terms of image quality. Here a test photo and a respective edit.

flat jped as shot

edited with Google Photos

In this edit, I tried to keep as much detail in the foliage on the upper right, while also having detail in the clouds.


Thursday, July 17, 2025

The Hype of the Camp Snap - I Get It!

You certainly saw the ads all over social media, the "cheap" camera that does not have a screen and is supposed to replace disposable film cameras. I have seen the ads, I ignored the ads, still, I liked the idea of a non-chimpable camera. Ordering... too much of a huzzle. 
Lately, I was searching for something at MediaMarkt. Just walking along the by now tiny camera section. And there it was, the Camp Snap for €69. So, I grabbed one.

What a surprise this little bugger is! I knew about ability of the camera to use image profiles, however, I was unaware of the extend of popularity of such profiles by now. For those unfamiliar with the product, it feels really cheap and light, fits into pockets. 

There are presently (still) a few different models on the market. Make sure to get the V105. This version is equipped with eyes for a shoulder-strap. While I won't be using a strap with this device, it also switches on by a mechanical switch, rather than the shutter button, which I believe is very beneficial. Also, the V105 comes with the latest firmware, the one that supports those image profiles I mentioned above.

The Camp Snap webpage offers an interface to create your very own profiles, which is excellent! Right away I tested some low-key high-contrast black&white stuff. Looking really good! Of course, this is a tricky profile, since the good looks strongly depend on the lighting situation. 

Some experiments later, the idea popped up to create a very very faded or flat "filter" (as the profiles are called). The thought behind that was to have a decent latitude for post-production, similar to log-profiles in video-recording. In essence, this is the opposite to the gritty B&W profile I mentioned above. 
And here was the surprise. Just using Google-Photos, the adjustability of the images is enormous. A flat profile is of course very forgiving what lighting is concerned. 

For those interested, here is my first version of the faded (flat) profile.


As you can see, I pushed blues a little bit and reduced green. The intention was to create a balance between green and blue. Brightness is slightly up, to avoid underexposed shadows. However, maybe this blows out the highlights more than necessary. Also, contrast could potentially still be a little bit to high.

Next try (untested):


So, one generates these "filters" and put a single one in the root-directory of the cameras µSD-card. Meaning, whatever lurks there will be used until replaced by something else (or deleted).
How can we do that in the field, without a Chromebook (in my case)?
I created a directory on the µSD-card containing all my filter files. In the field, usually I would have my phone with me. The camera can connect to my phone with a USB-C-to-USB-C-cable. In fact, the cable that came with the camera. Once connected, I  delete the filter-file in the root-directory and copy one of the files from the filter-directory into root. => Unmount the camera from the phone. Done!
With the next power-up of the camera, the filter-file is read and used.

In the respect of being able to shoot extremely flat images, this camera is almost as good as one that can shoot raw. And yes, flat images and raw files, both require post-processing...

PS: I just found out that the "very_flat" profile is a good starting point to B&W image creation using Google Photos.


Thursday, July 18, 2024

Peaking through the soup

As a regular reader of my irregular blog, you might have noticed that I got myself a Dwarf-II some time ago.
Just lately, I spent some more time with the device, shame on me. 

You may know that I do live in the Netherlands, one of the worlds most light-polluted regions. On top of that, we have pretty murky skies in general. Not the best for astro-stuff.
Having earned my astronomy degree in the field of open stellar clusters, stellar matter was always interesting to me. Most astrophotographers are focused on colorful images of nebulae, which I do appreciate myself too.

Colorful, i.e. full spectrum images, require a pretty clear sky. Again, no such thing in NL. 
Some weeks ago, I ordered 800nm IR pass-band filters. Those arrived lately. Certainly those are not really narrow-band, but that's OK. 
The main idea was to use the filter(s) in front of the Dwarf-II's telescopic lens. 
The Dwarf-II has an option to pass IR to the sensor. This has got some implications:
First of all, IR light can reach the sensor (daaahhhh!). Not so fast, all other smart-telescopes do not let IR trickle their sensor.
Secondly, this enables an almost monochromatic imaging mode when used with an IR band-pass filter. Well, that is exactly what I described above.
Thirdly, IR astronomy still works in murky conditions, somehow at least.
A minor forth point might be that the RGB-filters on the image sensor might not have a great effect on IR radiation, thereby keeping up the resolution of the sensor.

Why am I so enthused about monochromatic imaging? When taking images of full-spectrum radiation sources, such as star and galaxies, one does not need any other "colors". The particular advantage is that all light from a source will be focused at the same place on the sensor, i.e. not chromatic aberration issues. 

The added benefit of IR is of course the reduced influence of the atmosphere. 

However, when collecting images one needs to understand that the portion of light collected is restricted. Therefore, one might consider to experiment with amplification. 

The following images are screen-captures from my table during acquisition. There is no post-processing involved at all. You also see a photo of the sky conditions during the data acquisition.

stack with statistics

spectrogram and curve

conditions during data acquisition


Tuesday, May 28, 2024

DWARFLAB app on the Amazon fire HD 8 (2022)

The DWARF II Smart Telescope is a very neat device, embraced by many. I use mine usually with a 10" Android tablet, when at home. This tablet is a little bit too large to fit into the DWARF's bag however.
For portable use of the telescope, therefore my Android phone was the only option. As well as the app is, it is tricky for me to operate with cold fingers. Even with warm hands, the small screen on the phone is not really helpful.
Consequently, I felt the need to purchase an inexpensive Android tablet, small enough to fit in said bag, but big enough for easy operations.

Tablets with smaller screens were popular once. Today, there are only a handful models with modern specs available. The 3 brands I am aware of are Amazon, Lenovo and Samsung. This order seems not only alphabetical, it also reflects prices from low to high. 

Here is an overview about the dimensions in mm we have to consider:
device        length  width
DWARF II      204.0   130.0 (height)
A. fire 7     192.0   115.0
A. fire HD 8  201.9   137.34
L. Tab M7     176.3   102.9
L. Tab M8     198.2   122.6
S. GalTab.A8" 206.6   126.7

All things considered, the Amazon fire HD 8 made the race. First of all, the specs of the fire HD 8 are a lot better than those of the fire 7. Further, the fire HD 8 was on clearance sale, decently reduced, so the purchase of another gadget could be justified.

Does it fit in the bag? Perfectly. 

The big question of course is, if the DWARFLAB app can be installed on a device which is, unless hacked, very restricted in its abilities. Of course the DWARFLAB app is not in the Amazon Appstore, not a big surprise here.
However, DWARFLAB has the app as apk-file for download from their webpage. The "Silk Browser" (the browser of Amazon's fire tablets) surprisingly let me download said apk-file. There was a little trick however: one has to hold down on the download-link until the browser offer to download the link. Just tabbing the link did not do anything for me.

The browser than will ask for permission to write file to storage, with the warning that such files could harm your device.

Once the file is on your device, you can install the DWARFLAB app, after confirming security concerns of  Fire OS.
The application runs perfectly fine on the Amazon fire HD 8.

Having a comfortable UI for the DWARF II, I would consider today's exercise a success.


Tuesday, February 20, 2024

Godox Lux Senior

Well, that might be a first to me, I am actually praising a product. And no, I was not gifted the product. In fact, I had a hard time to purchase it in the first place. All the usual places were out of stock. Actually, one provider reimbursed my prepayment. Finally I was able to procure the device, surprisingly at a very decent discount. 
That made me think that this product fell out of grace somehow.

So, what are we talking about? It is a flash unit, not a speed light. An old style flash unit that you would traditionally feed flash bulbs to, one at the time.... However, there is a modern interpretation of such a device: http://godox.com/product-a/Lux-Senior.html 

When deployed, the circular reflector has a diameter of 11.5cm. In this setting, the flash creates a directed beam of relatively soft light. Not exactly a beauty dish, but not far from it. That's what you see from the interwebs anyway.
However, there is another non-bespoke way of using the flash, namely with the reflector NOT being deployed. Now we are looking at a 180 degrees light source having a tiny portion of a top reflector towards the subject.  Depending on the settings of your reflectors, this opens a ton of opportunities. Not to mention slaves in this scenario.

Using this unit as a slave opens more options that I am willing to describe. 
I hope that Godox will continue this product! This may be the most flexible one ever, in combinations with remote triggers and light modifiers.

Godox, if you read, continue this path (and send me products for testing).