Showing posts with label HDR. Show all posts

Thursday, March 27, 2014

Possibilities of HDR

Ah, here he goes again... high dynamic range... hated by so many. And yes, I agree, HDR images can look really horrible!
Besides creating the final image, HDR techniques can be interesting tools to get to an image one was aiming for when shooting.

Let's start with a normal single frame photo of the scene. This is the middle frame, i.e. the normal exposure image, of my HDR shot:
Single shot @ -2/3 Ev
Just in case, here is a link to the photo.
It was a nice sunny day, contrasts running up pretty good! In such a situation, there is just so much one can do in post processing... saturation in both, the whites and the blacks. A picture essentially unusable. This shot is already 2/3 of a stop under-exposed, but still, the whites blow out. Of course, all the detail inside the depot is lost.

When using HDR as an intermediate tool, you will try to only compress the dynamic range and leave the rest essentially alone. The result will be a very very bad looking picture, but this is a good thing!
Have a look at the result of a 3 frames HDR (not cropped, just scaled down):
3 frames HDR
Of course, blogger will "improve" this image, so please have a click on the link below.
LINK!

No, this was not a mistake, this was made that dull on purpose. Looks pretty odd to, like if there was fog. Fog would create very soft light, but the light is not soft at all, in fact, it is pretty hard, as you see from the sharpness of the shadows.
However, all of a sudden, in the lights, a tree is visible behind the building. At the same time the trusses inside the depot make an appearance too.

My picture shows the old tram depot of The Hague with ... old trams! Ideal to shoot an "old" photo.
Here, HDR can give me all the details, in inside the depot and outside it in bright sunlight.

Of course, conversion to black and white is the first step in the process.
The second step is to drop the highlights and raise the shadows, both to personal likings of course.
As a third step, the whites are driven up, just 'til the first regions saturate, the same with the blacks, of course downwards this time.
The second and third step is why HDR was used in the first place.

Optionally, noise reduction and sharpening could now be additional steps in such a workflow.

The result is a clinically clean black and white image. By far to crisp to be "old". To make a picture old, we need to add grain, as in the good old chemical photography times.
But, grain is not all, old lenses, I mean really old lenses, showed some distinct vignetting, which has to be added for the effect.
Actually, before vignetting, I cropped the photo a bit, as to fill the frame. I like the tracks, but not so much the bike stand. The bits of sky are not really adding much either.

The final image is that:
Old tram depot The Hague
And again, you may want to click this link, just in case blogger improved my image again.

A little bit of self-critique: I might have been a little heavy handed on the vignetting and the sepia color may be a little off. However, all in all, the image came out as envisaged.

Technical info:
  • Olympus PEN E-PM2
  • Olympus M.Zuiko 14-42mm II @ f/9 f=42mm
  • ISO 200
  • middel image: t=1s/200
  • shot in RAW
  • HDR: -3/0/+3 @ -2/3Ev

Wednesday, January 29, 2014

Lunar Photography on the Cheap II (gratis/free)

Yesterday I showed how to take a lunar shot with a simple point&shoot camera with a 8x zoom lens. Of course, the trick was that this inexpensive camera is able to shoot in RAW (thanks to CHDK).

Towards the end of the post, I mentioned that I used commercial software, i.e. Photomatix, to deal with the "develop" part of things. Further I stated that this process would potentially be possible with "free" software.

Today, I gave it a try with Luminance HDR (version 2.3.1), which is free software, to my knowledge.


Preparation

Luminance HDR asks for bracketed frames. Well, with my single shot, I only got one frame. So I used a very common HDR trick, namely creating more frames, differently "exposed" by software. Mind you, I am shooting DNG (digital negative).
Here is how this trick is done (with is free software by know):
  • open the shot in Rawtherapee
  • go to the EXPOSURE menu
  • click on 'Neutral' (this should bring everything to default values)
  • export the image using TIFF-16bit (this is your 0Ev shot)
  • drop the exposure to -2Ev
  • export the image using TIFF-16bit (this is obviously your -2Ev shot)
  • raise the exposure to +2Ev
  • export the image using TIFF-16bit (this is obviously your +2Ev shot)
Done! You now got 3 frames of identical size and format with different exposure values. That's what HDR-software likes!

The first results in Luminance HDR were not that great. Actually, they were so bad (a lot of grain and noise, over-exposed bits and what not), that I decided not to show those. The software is not easy to use, so I will give it a second try (see below).


Gratis

There is another bit of HDR-software available "for free", i.e. gratis. So we are not dealing with free software here, however, one can use this program without paying for a license.
The program is called FDRTools Basic.

Having loaded the 3 frames into FDRTools, the results were better, but not really satisfying yet. It appeared that the +2Ev frame was not serving any reasonable purpose, hence, I excluded this frame from the process (this is a very nice feature of FDRTools, it is like making invisible a layer in GIMP).
And guess what, the result was instantaneously much better than yesterday's Photomatix results!
Here is the re-sized output, converted into PNG:
2 frames pseudo HDR using FDRTools Basic


To me, that was a stunning result, coming from gratis software! A lot less noise than in yesterday's attempt.

Still, this photo could be slightly improved in GIMP, using the masking technique I explained in the previous post, i.e. the sky was treated with 'wavelet denoise' and the moon with 'wavelet sharpen'.
after GIMP
In the original 16 Megapixels image, the difference is somewhat visible. The above shown scaled down versions look almost identical to me.


Free

And here is the promised text about the entirely free solution.
Learned from my experience with FDRTools, I only loaded the -2Ev and the 0Ev frame into Luminance HDR. So for so good, but now the hard part.
Luminance HDR offers a lot of different algorithms to combine the frames. I went for "Profile 1".
Luminance HDR offers even more algorithms to tone-map the image. And this is where it went wrong in the earlier attempts. Having tried all different options, I selected "Reinhard '02", pulled 'Key Value' to 0.01 (none of the other tone-mapping parameters have any effect at this stage). In order to darken the image, I use the 'Adjust Levels' histograms. And voilà, we got a presentable result created by free software.
2 frames pseudo HDR using Luminance HDR
There is still more noise in the image than in the image created by FDRTools. Again, this calls for the GIMP.
Here we go, same technique as described previously... and here is the result:
denoise / sharpen by the GIMP
Yep, the differences are getting really subtle now, which of course speaks for the use of free software!

I hope you enjoyed this little journey from commercial to gratis to free. Personally, I am not sure if gratis or free won the contest. But certainly commercial produced the least favorable result in this particular case. But than, using software of this nature is somewhat of an unfair abuse, isn't it?

Saturday, January 4, 2014

Legacy Series, Another Kind of HDR Photography

M42


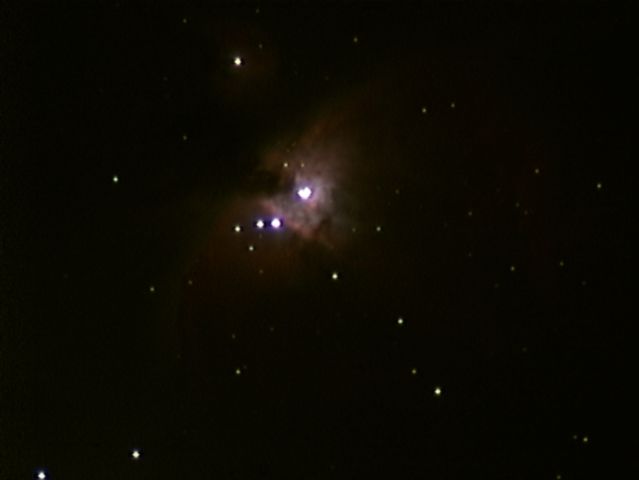
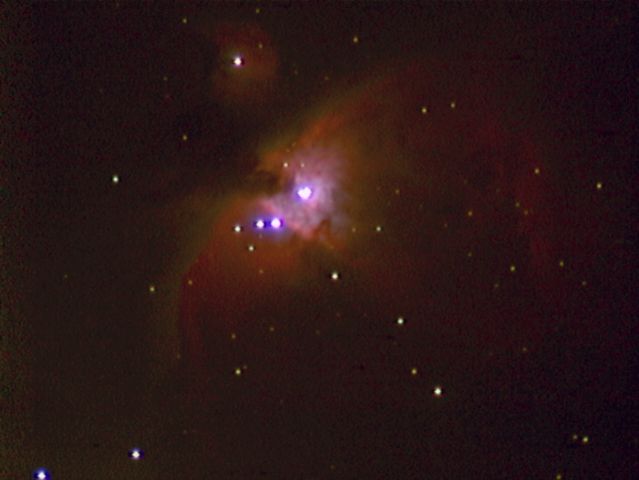
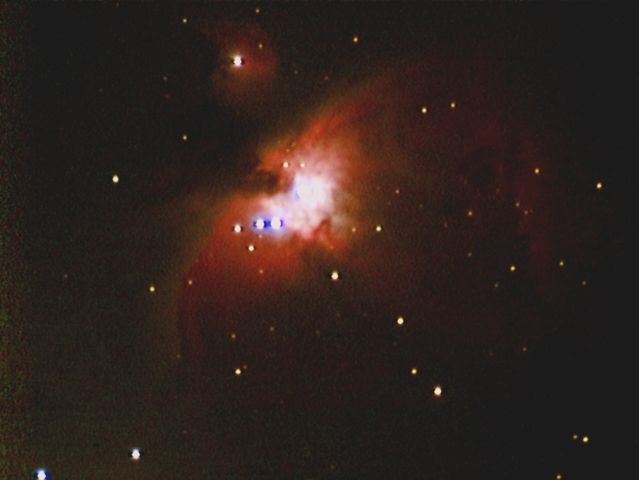
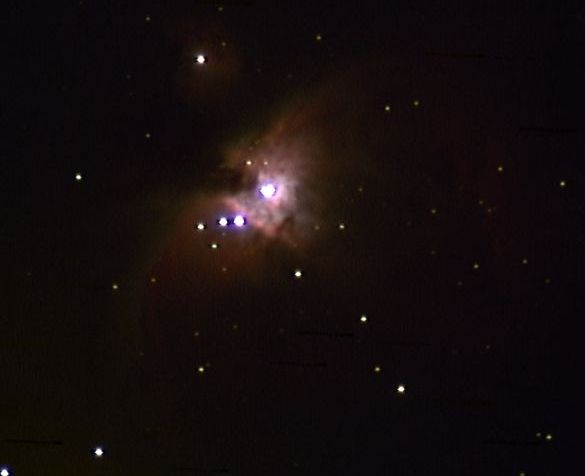
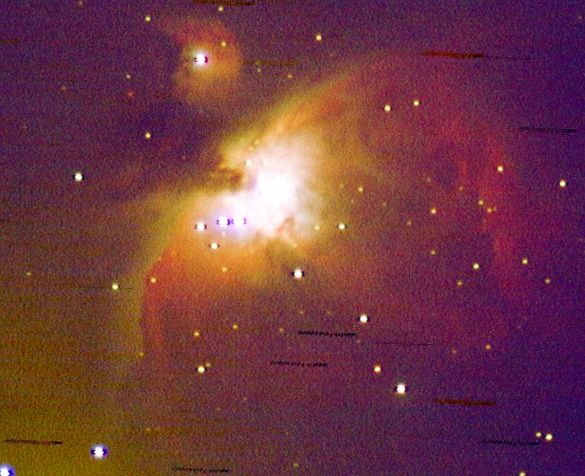
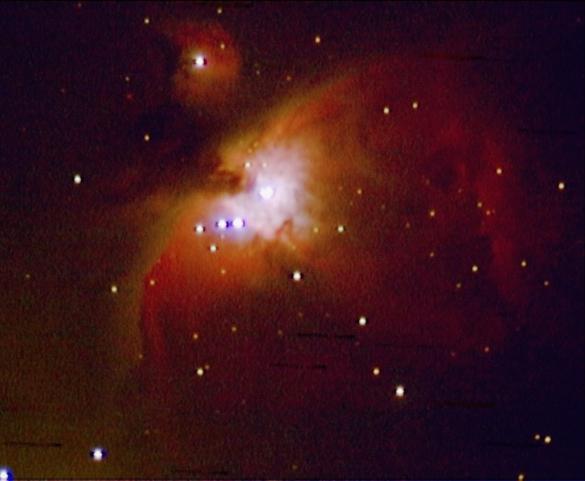
Finally, some time and sky to work on long exposure webcam-astronomy... The remaining clouds allowed an open view on Orion. M42, certainly one of the more prominent objects, easy to see and easy to record, gives a perfect light source for experimenting as it includes a very bright open cluster as well as a dark cloud and a bright nebula.


Instrument
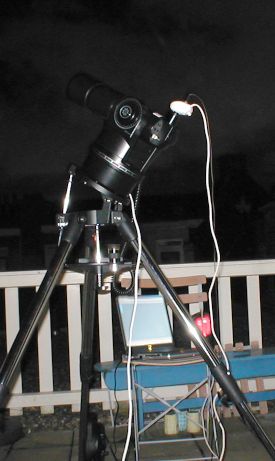
ETX-70 equatorial mode, #494 autostar
Camera
ToUCam pro PCVC-740, Baader IR filter
Data acquisition K3CCDTools, 10s exposures
Data registration
RegiStax 2, K3CCDTools
Frame stacking
RegiStax 2, K3CCDTools
Postprocessing
RegiStax 2 & IrfanView, iMerge

Some resulting images (based on the same recorded AVI file - have a look at a compressed WMV version) were obtained using different sets of postprocessing parameters (contrast, brightness, saturation, gamma curve, etc.) in order to respect the different aspects of the complex object. All image tuning steps were carried out on all pixels equally (no area selective tinkering).


The Results


Image resulting from registration and stacking, no postprocessing


The above "raw" image postprocessed using IrfanView


Light postprocessing using RegiStax


Massive fiddeling with RegiStax and IrfanView postprocessing


Registration using K3CCDtools linear scale


Registration using K3CCDtools logarithmic scale


All above combined using iMerge


The Observatory

Have a look at my hyper-professional setup to catch the hole in the clouds (greyish stuff above the roofs in the background). Even though the mechanical setup looks pretty solid, the RA motor of the fork produces some jitter occasionally. Consequently I performed a manual selection of the frames to be registered, resulting in a loss of about 30% of the 10sec frames.


Wednesday, January 1, 2014

Handheld Bracketing w/ CHDK

If you followed this (young) blog, you may know that the first ever post was about handheld HDR using the very fast 11fps of the Lumix LX7.

Lately, I kept myself busy with Canon stuff, in particular the CHDK and cheap P&S cameras. For purpose of experimentation, I bought an IXUS 140 (aka ELPH 130). The 140 is a cute little camera I really like, very pocketable, CHDK, although ALPHA, works as a charm!
The cheap chap that I am, I only afford the camera with a really old Sandisk Ultra II 2GB SD-card. I am sure that there are faster cards available... however, this is what was sitting unused in my desk's drawer, hence, that is what I use(d).

The drawback of using an older generation SD-card is of course the speed in which data can be written to it. In particular when saving data in RAW, this plays a major role.

For matters of experimentation, I took the camera, set CHDK to bracketing in continuous mode and took some shots. Photomatix was used to create the DHR images.

The first HDR image that I would like to share is a shot in which I used 3 frames recorded as DNG (which is essentially raw data). The middle frame was shot with -1 Ev. Lens distortion correction was applied to the final image using RawTherapee.
3 DNGs - lens distortion correction using RawTherapee
If you look closely, the branches in the center of the image display some ghosting. It was a windy scene and I did not go through any major anti-ghosting procedure.

The second shot is an HDR image using 5 JPG frames. Again, the middle image at -1 Ev.
No geometrical correction applied here, mind you, the camera's firmware does something already when recording JPGs... something that actually over compensates at wide angles.
5 JPGs - no correction, note that the camera itself over compensated
Here you have it, even a slow and inexpensive camera can be used for handheld HDR photography. 3 frames in RAW (or DNG) or 5 frames in JPG, w/o a tripod, both demand a very calm hand...
In this shot, I used the anti-ghosting tool of photomatix on the approaching tram.

Here is how I do it, inspired by Discovery Channel reporting about snipers:
  1. calmly prepare your camera, making sure all the setting are correct, e.g. exposure compensation
  2. stand firm on both legs, feet at shoulder width
  3. breath slowly but steadily, wait until you body settles
  4. hold your camera with both hands
  5. press your arms against your chest
  6. relax
  7. breath in deeply
  8. exhale slowly half pressing the shutter release
  9. when your chest is relaxed and your lungs exhaled, gently press and hold the shutter release
  10. freeze (not thinking about it!)
  11. hold your breath and wait until your camera recorded the 3, 5 or 7 frames you need.
Step 11 may actually take some time, training increases the time you can hold your breath w/o moving.

All in all, handheld HDR photography remains a challenge. It is best done with a fast bracketing camera, such as the Lumix LX7, however if the camera at your disposal is somewhat slower, there is still hope!

Record photons!

Tuesday, December 24, 2013

Manual HDR Photography

To be clear from the beginning, this is about manual, i.e. as not automated, HDR photography, not handheld. Although it could potentially be done handheld, for starters I recommend a tripod.

Outside it is raining cats and dogs with a lovely storm going on, hence, I decided to stay inside this Christmas eve. Consequently, there are no landscape or architecture photos accompanying this particular post.

Some years ago, I picked up a P&S camera for various low demand purposes.
Selection criteria: it needed to
  • be inexpensive
  • run on AA or AAA batteries
  • use SD-cards
  • have a tripod mount.
That was essentially it. The choice fell on a Samsung S760, which serves me well. Most of the photos shown on my other blog (draaggolf.blogspot.com) are actually shot with this particular camera.

You may have guessed from my blog, that I experimented with HDR for a few weeks. Fun stuff. However, the variety of AE-bracketing cameras is rather limited and placed at the higher price segment, cf. http://www.hdr-photography.com/aeb.html.
However, we know that all that is required are 3, maybe even only 2, images of the same scene, with the same aperture but different shutter speeds.
Of course it is very convenient if AEB is already built into the camera in an automated way, in particular if it is as speedy as the 11fps of the LX7. But, it can be done with almost every digital camera on the market, provided that the camera has got a possibility to adjust exposure compensation, in one or the other way, and preferably has got a tripod mount.

Here is where in S760 came in. The camera employ a manual mode, with a +/-2 exposure meter... very handy! And, in addition to that, this particular model is equipped with a 2s or 10s self-timer.

Here's my workflow for bracketed exposures using the Samsung S760:
  1. Mount the camera on a tripod and set your scene.
  2. Switch mode dial to "P".
  3. Power up.
  4. Half-press the shutter release, the aperture and the shutter speed for a "normal" exposure will be displayed; try to memorize the numbers.
  5. Change mode dial to "M".
  6. Hit the "Fn" button, aperture and shutter-speed will be displayed in red.
  7. Introduce those values with the "5 function button". This will be you middle frame.
  8. Hit "OK" to confirm the settings; aperture and shutter speed will be displayed in white.
  9. Engage the 2s timer by pressing the right part of the "5 function button" twice.
  10. Press the shutter release to start timer and step back!
  11. From here on, steps 6 to 10 will be repeated with difference that in step 7, only the shutter speeds should be changed. Multiply the shutter time by 4 to obtain a +2EV frame, divide the shutter time by 4 for a -2 EV frame.
Quick and dirty through the window demonstration:


HDR by exposure fusion

I am not sure what blogger does, it seems that blogger tries to "improve" the images... the original of the over-exposed frame is much brighter and the under-exposed is much much darker. Anyway, you get the idea...

The only downside to the whole story is that this camera, like all in-expensive P&S cameras, does not write RAW files. Compression artifacts may cause problems under certain circumstances.

Friday, December 20, 2013

Driving the G15 to the Limits

Today I gave the Canon Powershot G15 a session. First during daylight, later after sundown.
Of course, I tested the HDR capabilities, i.e. handheld bracketed frames. Additionally, I took photos with bokeh and also tried the built-in HDR function. The composition of those photographs are not good, I admit, however, composition was not the point of the tests I was doing.

Bokeh
Lets have a look at the bokeh first. The following image is recorded in RAW (of course), scaled down and exported to a 100% quality JPG.
Canon G15, f/1.8, s/400 @ ISO80, EV-1

HDR
What about HDR then? Well, here comes a test. The following photos will show the same scene, shot whilst the camera was solidly stable on the handrail of a pedestrian bridge.
the scene, single shot f/1.8, s/1000 @ ISO 80, EV-2
The built-in HDR function takes 3 frames (no user control), chews on them and spits out some photo. This is the result:
Built-in HDR, f/2.8, s/100(?) @ ISO80 (according to the camera)
And here is that same scene, shot in exposure bracketed mode, actually, the "single shot" is the middle image of this HDR.
no tricks here, 3 frames, -4 (s/2000 ??), -2 (s/1000) and 0 (s/250) EV, f/1.8, ISO80
To me the result is pretty obvious, the built-in HDR function solves some problems, but lags behind traditional HDR methods. In favor of the built-in HDR it is to be noted that the 3 frames are taken in a shorter time in comparison to the exposure bracketing mode.
I have the impression that the exposure compensation dial has no influence in the built-in HDR mode at all.

Handheld HDR
Now we are talking handheld exposure bracketed frames combined using HDR techniques. The problem with the camera is that it takes those 3 shots with about 1fps, giving the photographer a lot of time to ever so slightly move that camera. Using the optical viewfinder helps to reduce such a drift, also the position of your arms are more stable that way.
I skip showing the middle image here.
middle frame data: f/4.0, s/320 @ ISO80, EV-0.3
Pretty decent performance, thanks to the available HDR software.

Extremes
Later that day, I decided to pay a visit to the harbor of Scheveningen. At the time I got there, daylight was completely gone, stars were showing in the sky.
So it was time to try the extreme, a handheld set of bracketed photos under extreme light conditions.
Have a look:
middle frame
final HDR
There we go, dark sky and super bright deck-lights shining directly into the camera. I am sure there are better ways to treat the frames, however, it is clear that this how far this camera can go, not a bit further...

Conclusion
The Canon G15 does a good job. Despite the bracketed mode being a bit slow, it is possible to use this camera for handheld HDR photography purposes. However, the built-in HDR mode should be avoided, in particular since there a no anti-ghosting provisions.

The bokeh of the lens is not too bad.

Thursday, December 19, 2013

Using C1 for HDR

Short note using the custom settings dial position(s) of the Panasonic DMC-LX7 for HDR.

If you search the internet about the C1 and C2 custom settings position, folks seem to advice to setup those memories using the P mode. Not sure why that is, maybe those folks believe that the P stands for "programming"... Well it does not, it stands for "Program AE", which is a mode that automatically selects the shutter speed and the aperture value. This mode allows for a little bit more user control over the camera's settings, e.g. ISO, in comparison to the iA auto mode. That's all there is to P.

For my HDR purposes, I actually configured the camera to my likings in A mode, the mode used for exposure bracketing, and saved those setting into C1. Why C1? Very simple, C2 has got 3 sub-modes, which the user needs to select via a menu. Anything under C2 is therefore not directly selectable.


Here are some of the settings (non exhaustive list) I use and why I use those:

AUTO ISO / max ISO 400
In the very beginning I used max ISO 80, which is fine in pure daylight. However, if you allow AUTO ISO, this is what the camera will selected anyway (watch you ND-filter). Under low light, ISO 400 still produces reasonably low noise +3EVframes with handheld-compatible shutter speeds.
Don't go any higher however! My experience is that the camera will select ISO 80-160 for the 0EV and ISO 80 for the -3EV shot.

Stabilizer OFF
Well, I love the stabilizer for single frame shots, in particular in lower light and/or longer lenses. However, the O.I.S. (Optical Image Stabilizer) uses a mobile doublet, see image below, which will cause tiny changes to the image geometry.
There is nothing wrong with tiny changes in image geometry, unless you want to match image coordinates from different frames.
Consequently, I want OIS always engage, unless I am taking bracketed frames for HDR.

FN button to "Quality"
This might look funny since you would consider to shoot in RAW only. That is entirely true, however, occasionally it comes along handy to also have a JPG recorded. The LX7 is able to record a JPG file next to the RAW file. The content of this JPG file is actually configurable in the camera itself, even camera effects will have influence on this file. A push on the FN button now allows for a quick decision to include or not said JPG file.


Wednesday, December 11, 2013

Handheld HDR Photography ...

... can it be done?!

Here I am, writing my first entry in my newly created photography blog. Of course I had to pick a rather controversial topic to start with, HDR photography.

History

The first encounter with HDR photography was in the photography club in my school, I was 14 years old to that time. We tried to learn and master Ansel Adams' technique which of course required a lot time spent in the darkroom playing with liquids. Of course, as soon as affordable digital cameras were made available, somewhat mid/end nineties, I had to have one... However, the fun was limited, since the quality was rather capped, etc.
Not having that much time any longer to spend shaking development tanks (my enlarger has not been used in more than 30 years by now), and seen the inferior lomography like quality of the digital images, photography turned into some "point and shoot" experience for the occasional snapshot.

Mid this year, I picked up my aging Canon EOS-350D (aka. digital rebel) and started playing with bracketed short in aperture priority mode. This experience is/was a mixed bag, however, a tripod appeared to be an absolute necessity. Of course, a tripod is somewhat cumbersome to carry about and also the camera, although one of the smaller DSLRs is not really handy for everyday use.
 

The Camera

Consequently, the decision was taken that a new camera was falling due. The choice fell on a Panasonic Lumix DMC-LX7, initially mainly for the reason that it is able to do ±3EV bracketing.
Without knowing it yet, the basis of my decision seems the criterion for shooting handheld HDR.
Of course, the very fast Leica lens with an F-number of f/1.4 and the neutral density filter were very welcome features (BOKEH!!!).

There are some additional technical features to this particular camera which help a lot taking  bracketed images w/o a tripod. The particularly interesting feature is the camera's ability to take 11fps bracketed shots in raw.

Now, lets have a look why this particular camera makes it possible to shoot bracketed images for HDR without a tripod.

Principles

What you are looking for in HDR is to collect the details in the lights and in the shadows, cf. Ansel Adams' "Zone System", which are lost in the your typical "correctly" exposed photo due to the limitation of the dynamic range of your recording medium.

In principle, what we are looking for in the over exposed image is totally blown out lights and good texture in the darks. Concerning the under exposed image, we are looking for entirely black shadow and good texture in the lights.

Experience

Mind you, I am relatively new to this. The photos shown below are at the beginning of my learning curve. Also, I try to display what I have seen myself, in other words, I try to keep colors at levels which I believed I have seen. Maybe, at some later stage, I might create those artsy color overloads which HDR is infamous for.

The following shots were taken with my handheld LX7 in "P" (ups! - details in the image captions). Shooting HDR brackets in "P"? Well... it was a mistake, I took some non-bracketed photos before and forgot to change all the settings. Of course, you want to shoot your images for HDR in "Av".
Those (raw) images are not treated at all, just scaled down and saved as jpg.

normal exposure - looks kinda odd (f/2.8, 1s/1600, ISO 80)

overexposed - as expected (f/2.8, 1s/200, ISO 80)

underexposed - not so much to see here (f/6.3, 1s/2500, ISO 80)
Actually, seen that the camera decided to stop down the under exposed image at a very fast shutter speed, the use of the ND-filter might have been a good idea. Luckily, the aperture change did not influence the geometry of the underexposed frame.

It is evident that those images show the textures mentioned above. Of course, this is a cliché shot for HDR photography and yes, the composition is a little on the boring side, I admit.
After having mingled together the 3 raw photos, this is what my result is:

final HDR photo
For obtaining the final result, anti-ghosting was used on the car. Other than that, I tweaked the colors, contrast and brightness a bit, using the GIMP. Essentially, I reduced color saturation and leveled out the image a bit.

Note the features highlighted in the following image. The details annotated in blue are results of the underexposed frame, while the features marked in red are a result of the overexposed contribution.

annotated final image

You may notice that the grass is a little bit greener on the result than on the over exposed shot. I wanted to show more texture on the trees' trunks, hence, I boosted the over exposed data a bit. Of course I would have done that in masked layers, however, I decided to not apply any "special treatment" to the photo, in order to demonstrate pure HDR photography.

Personally, I am pretty pleased with the result, in particular since this is handheld HDR photography, which most folks say was impossible.