Friday, October 4, 2019

Huawei P20 pro "Aperture mode"

While the P9 was already equipped with an synthetic aperture more, i.e. blurring the background, effectively, I never used it. With the P9 I shot either in RAW or in monochrome, for which the aperture mode is not available.

In the P20 pro, RAW is still RAW, the image information as recorded by the sensor, things have changed for the monochrome camera. Unfortunately, there is still no RAW data available from the monochrome sensor.

However, next the normal and pro modes, which were already known from the P9, Huawei added the aperture and portrait modes to the monochrome camera.
I have yet to experiment with the portrait mode.

The aperture mode provides some nice results in monochrome.
simple solid object

However, since this is all synthetic and merely based on triangulation of the distance, the algorithm does not handle reflections properly.
reflections on water
As you can see in the image above, curtain in the background is totally blurred, i.e. out of focus, while the reflection on the water surface, the curtain is in focus.

Therefore, when using artificial aperture mode, it is advisable to avoid reflective surfaces.

Tuesday, October 1, 2019

The last of its kind

The first and the last, I got!
you might wonder what I write about...
The first and the last smart phone with a pure and honest monochrome camera.
Some years ago, I purchased the Huawei P9, on which some posts are available here. The P9 was my phone ever since. Some coincidence had me looking into yet a more modern smart phone. Again, my preference was to have a monochrome camera available.
It seems, the Huawei P20 pro and P20 mate are the last generation smartphones employing a true monochrome sensor.
Consequently, I got a Huawei P20 pro (less expensive than the P20 mate).
Up to now, I am not convinced if the P20 pro is superior to the P9. I found some pros and cons on both.
Stay tuned, I will do some testing and comparing both phones in the near future.

Tuesday, July 23, 2019

China Ball update

The original China Ball illumination is omni-directional, unless used with a black screen. When using a China ball as a somewhat shine-through umbrella replacement, we wish to add some sort of directivity to the light-source.

The frame of the China ball helps a great deal. Aluminum foil can be fixed to the frame to re-direct light to the "front" of the ball.

Simple reflector for the light-source in a China ball 

Sunday, July 21, 2019

China Ball studio light

Lately some brainstorming with a friend lead us to improvise portable China Ball lighting for a small vlogging setup on the cheap, after having discussed the use of lighting stands and soft-boxes.

The basic idea is to use materials as inexpensive and in-obstructive as possible. While hanging China Balls might be the obvious choice, however, this means that the lighting setup is not really portable.
We came to the conclusion that a suitable floor lamp would be able to hold a China Ball in a decent height, enough for a desk to be illuminated with a soft key light.
A first choice fell on an IKEA product called NOT.

The next problem to be solved was to mount a China ball to the lamp, such that the light source is essentially in the center of the ball, while the ball remains easily removable.
Household grade China balls are usually hung with little eyes on hooks.
Collapsed China Ball as seen from top, note the eyes to the right and the left
Having a ball mounted on a stand, it needs to be mounted upside down.

Your regular household China ball comes with a steel wire frame to suspend the ball from the electrical wire. This employs some sort of clamping mechanism. With a little bit of pliers work, this clamp can be re-purposed as a lower stabilizer. Have a look:


Only one of the two arms is used, the other is bent out of the way

This is how the frame engages with the post of the floor lamp

The frame of a China ball is created by welding two rods together. This creates a very small lip in the middle of the frame. Here this lip is arranged to abut with the metal cone of the lamp housing.

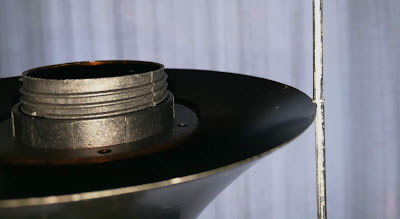
Weld of the frame rests on housing cone
To fix it all, gaffers' tape can be used. For better visibility, white gaffers' tape is used for demonstration.


Needless to say that in this setup, the China Ball is mounted from the top and clipped in to the little hooks on the lower end of the frame (*).

Top of the China Ball


Gravity holds the lower end down.

Bottom of the China Ball


In this example, a 90cm China Ball was used. Seen the flimsy wire holding it all up, a somewhat lighter, i.e. smaller, ball should be used. Inside the ball, there is a TRADFRI bulb installed. For the following photo, the color temperature of the bulb was set to warm in order to form a contrast to the bright blue sky shining through the curtains.

NOT and TRADFRI standing China Ball

(*) Clipping the hooks into the eyes creates tension in the frame and slightly deforms the frame. By doing so, the stability of the frame is compromised. During the first attempt, the ball was clipped to the frame. It turned out to not only be unnecessary, but also detrimental to the setup.

Just as a final remark, NOT, as it comes, provides a maximum height. Using less segments will provide a lower light height. Using more segments, e.g. from a second NOT, could increase the height. The latter option should be taken with great care to stability of the stand. Maybe adding some weight on the food for added stability.

Sunday, May 12, 2019

New Angles - Get a Selfie Stick

Lately, my life took some turns which prevented me from writing unfortunately. So, a lot was going on photography wise, which I did not (yet) document.

First of all, I have decided, early December 2018 actually, to quit my day job. So, my professional activities will certainly get a new angle. I will focus of photography and arts in general. However, this is not what this post is about.

In preparation to my new business, I began to look into stock photography. Some of my pictures already sold, so I am confident that I am on the right path here. Remarkably, about half my sales are pictures shot the my Huawei P9 phone, no kidding!
In stock photography, one needs to find a way to distinguish from millions of other photographers. And smartphone photographer are a real competition out there.

Today, I got a brain fart and solved the problem of being a little different than other smartphone stock photographers. I got myself a selfie-stick with a shutter release button for not even €4. With my arm upright the phone can take photos about 3+ meters from the ground, giving a very different angle, in particular in street scenes.
Here is an example: https://www.eyeem.com/p/141273640

I have to admit, figuring out the timing of such a shot, not seeing the screen of the phone and not knowing what the auto-focus will do and when the shot will be fired, is a bit of a gamble all together. However, this €4 accessory allows me to get photographs that look as they were taken with a €1k photo-drone. Even better, using a selfie-stick is legal, while the photo-drone would already be illegal for such a scene over here in The Netherlands.

In the light of that, I will certainly investigate into more sturdy and sophisticated selfie-sticks. 


Sunday, April 21, 2019

Oly OM-D E-M5 struggles

For some years, yes, years, my OM-D struggled to start up properly! Once alive, the picture were as good as always. What is going on? Personally, I get a sense of planned obsolesce, in particular since many more appear to be complaining about the same failure my OM-D exhibits.

Some additional searching revealed a solution found by some: set the camera to burst mode. It might fail a couple of times, but will continue in single frame mode eventually.
I can confirm that this will work initially.
However, once the camera is switched on again, the good-ole black-out will return.

By now, I experimented with switching the camera back to high speed burst mode, before turning it off. The next power-up will again lead to a black-out of the camera. Restart yet again appears to be leading to a camera that actually does not shut off immediately... up to now, this appears to be woking, i.e. booting the camera will result in a functioning device.

I am close to discarding the OM-D and abandon Olympus all together, in favour of the new Panasonic cameras employing IBIS.
By now, I can only share positive experiences using the Lumix GX85.


Thursday, January 3, 2019

(Semi) Stand Development

Some opinions might make you believe that you need at least 5ml of Rodinal to develop a film in stand development.

To be honest, I never understood that statement.

When doing stand development with 1:200 dilutions, I just eyeballed with what I got, and it turned out alright every single time; mainly for 120 and 135 Foma films. My tanks are using either 590ml or 250ml of liquid. In both scenarios, the amount of Rodinal is obviously less than 5ml for a 1:200 (give or take) dilution.

I have the suspicion that the above statement is more based on the lack of a device being able to provide decent accuracy for measuring small volumes.
While I do not claim this finding for me, I feel it would be a good idea to promote the finding by Will Agar.
While I did not learn about stand development from Will Agar, I was made aware of a cheap measuring device Will is abusing for photography purposes: the medicine (or dosing) spoon.

Dosing spoon
The dosing spoon is good for 10ml of liquid to be dosed. In my use, that would make about 2 litres of developer. However, the spoon displays sections of 1ml in good distance, such that a measurement in the region of 1/4ml is possible.
And yes, I used that kind of spoon to dose the amount of raw Rodinal required for my JOBO 1510 tank for developing a 135 roll of Fomapan with less than 5ml of Rodinal.


Method for 120 film:

  • pre-soak for 2min
  • rinse twice and empty tank
  • pour developer in tank and agitate slowly for 1min
  • tap tank a few times
  • let stand for 90+ min
  • empty tank and wash before fixing

Method for 135 film:
  • pre-soak for 2min and empty tank
  • pour developer in tank and agitate slowly for 1min
  • tap tank a few times
  • 2 slow agitations every 15min, tap tank after agitations
  • after 90min empty tank and wash before fixing

Maybe the agitations for 135 film are not necessary... however, in some experiments, the sprocket holes of the 135 film created streekes of uneven development. The somewhat regular but seldom agitation appears to overcome that problem. However, the agitations will also prevent some of the beneficial effects of stand development  to fully appear.