Showing posts with label tutorial. Show all posts

Sunday, July 21, 2019

China Ball studio light

Lately some brainstorming with a friend lead us to improvise portable China Ball lighting for a small vlogging setup on the cheap, after having discussed the use of lighting stands and soft-boxes.

The basic idea is to use materials as inexpensive and in-obstructive as possible. While hanging China Balls might be the obvious choice, however, this means that the lighting setup is not really portable.
We came to the conclusion that a suitable floor lamp would be able to hold a China Ball in a decent height, enough for a desk to be illuminated with a soft key light.
A first choice fell on an IKEA product called NOT.

The next problem to be solved was to mount a China ball to the lamp, such that the light source is essentially in the center of the ball, while the ball remains easily removable.
Household grade China balls are usually hung with little eyes on hooks.
Collapsed China Ball as seen from top, note the eyes to the right and the left
Having a ball mounted on a stand, it needs to be mounted upside down.

Your regular household China ball comes with a steel wire frame to suspend the ball from the electrical wire. This employs some sort of clamping mechanism. With a little bit of pliers work, this clamp can be re-purposed as a lower stabilizer. Have a look:


Only one of the two arms is used, the other is bent out of the way

This is how the frame engages with the post of the floor lamp

The frame of a China ball is created by welding two rods together. This creates a very small lip in the middle of the frame. Here this lip is arranged to abut with the metal cone of the lamp housing.
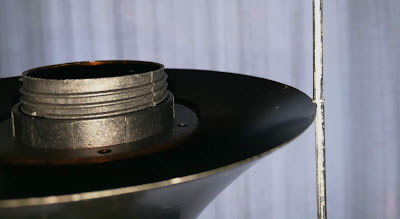
Weld of the frame rests on housing cone
To fix it all, gaffers' tape can be used. For better visibility, white gaffers' tape is used for demonstration.


Needless to say that in this setup, the China Ball is mounted from the top and clipped in to the little hooks on the lower end of the frame (*).

Top of the China Ball


Gravity holds the lower end down.

Bottom of the China Ball


In this example, a 90cm China Ball was used. Seen the flimsy wire holding it all up, a somewhat lighter, i.e. smaller, ball should be used. Inside the ball, there is a TRADFRI bulb installed. For the following photo, the color temperature of the bulb was set to warm in order to form a contrast to the bright blue sky shining through the curtains.

NOT and TRADFRI standing China Ball

(*) Clipping the hooks into the eyes creates tension in the frame and slightly deforms the frame. By doing so, the stability of the frame is compromised. During the first attempt, the ball was clipped to the frame. It turned out to not only be unnecessary, but also detrimental to the setup.

Just as a final remark, NOT, as it comes, provides a maximum height. Using less segments will provide a lower light height. Using more segments, e.g. from a second NOT, could increase the height. The latter option should be taken with great care to stability of the stand. Maybe adding some weight on the food for added stability.

Monday, January 18, 2016

How to Create the Weegee Look

Weegee? You might ask... well, this would refer to Arthur Fellig. Not sure who I am talking about? Have a look at wikipedia to find out.

Old days

Weegee's was best known for nighttime photography of crime scenes. His technique involved the use of flash bulbs, giving a very harsh look to the pictures. There is usually a hard shadow cast on the left side of the subject, which is a "dead" give-away that the flash used was on the right side of the camera; very common to large format press cameras.

Over the years, off-camera flash moved to the left side of the camera, in particular when flash brackets are used. Many point & shoot cameras of today have their flash mounted on the left side, the reasons of which is totally unclear to me. Anyway, the on-camera flash is too close to cast any meaningful shadow at regular photographing distance.


Modern age

So, here is what we need to do to create the typical look of the illumination typically used in Fellig's crime scene photograph:
  • mount a speedlight on a flash bracket
    • 1 foot to the right of the camera lens
    • 1 foot above the camera lens
    For the flash bracket, I got myself one that looks essentially like this one. Everything is adjustable with the bracket...
    Having the bracket on the right of the camera is a bit awkward, since cameras are designed for right hand use, with the shutter button on the right, which is, where the bracket is now. That of course means, that the camera now will be operated by the left hand.
    What the shutter release is concerned, there might be an option: a shutter release cable, with the button fixed to the flash bracket (I guess, I will build something alike in the near future).

    Digital solution

    Obviously, the above is all nice in theory, but, what about putting this into digital reality?
    Here is my setup:
    • Fujifilm X-M1
    • Fujifilm XC 16-50mm f/3.5-f/5.6
    • Fujifilm EF-20
    • flash bracket as mentioned above
    • flashgun cable for Canon by PIXEL Inc.

    Now to the technical settings, which are different from my usual way of configuring a camera:
    • AF illuminator ON
    • flash exposure compensation -1
    • exposure compensation -1
    • red eye removal off
    Here is why. With flash, there is not stealth photography, so, there is no reason to not use the AF illuminator. Flash bulbs were not that strong and weaker flash allows for a wider open aperture (see below). Further, lower flash power shortens cycle time of the speedlight. Also, we are still talking nighttime photography, despite the use of flash.


    And the "artistic" settings:
    • RAW+JPEG
    • film simulation B&W (obviously)
    • highlight tone +1
    • shadow tone +2
    • sharpness +1
    • noise reduction -1
    • auto ISO limit 6400
    • f=30mm
    • f/4.7 (i.e. as wide open as possible)
    This will need some more detailed explanation, I figure.
    Highlight tone +1 gives medium hard highlight details, resulting in slightly more contrast in the highlights.
    Shadow tone +2  results in very hard shadow details, enhancing the black feel of the JPEG image.
    Sharpness +1 in combination with N.R. -1 obviously adds some noise, similar to film grain. This effect could be further enhanced by forcing the ISO up.
    My present setup employs a kit zoom lens. 4x5 press cameras are usually equipped with a 135mm, slightly wider than normal primes. On an APS-C system, 30mm comes pretty close to the angle of view that a 135mm would produce in 4x5 LF. Using the XF 27mm f/2.8 (considered on of the best lenses in the Fujifilm system) could the solution.
    Finally, the aperture. Due to the long focal length of a large format "normal", the depth of field is pretty shallow. 

    In absence of any corpses in front of my house (thanks God!), I took two photographs of a bollard on my front yard. Both pictures are JPEG straight out of the camera. 


    Despite using the AF illuminator, the camera struggled to auto-focus. Anyway, I hope that the images prove that a Weegee-look is possible with the equipment listed above.

    When using an X100, X100S or X100T, obviously, one might want to use the TCL-X100 for the normal perspective, which would allow for f/2. The 23mm (35mm equivalent) would not be too far off, so any of the series would still be OK w/o the conversion lens.

    Conclusion

    Weegee used a flash with a relatively large reflector. Although I feel that the initial results look pretty decent, I will experiment to add a soft component to the flash, as to mimic the large reflector.

    PS

    Shooting with flash requires re-thinking of your exposure parameters, I am aware of that. Exposure for the flash is usually done by the aperture. Distances of 2m to 4m would suggest relatively closed lens, even with lower ISO sensitivities. The creative choice of shooting wide open therefore seems counter-intuitive. Since this look is not affected by ambient light, shutter speed is entirely irrelevant, so the faster syncs speed found on the X100 models won't help. However, the X100 models have a built-in 3 stops N.D.-filter, which could help expose correctly with the lens wide open.


    Tuesday, September 2, 2014

    Load 135 Film Correctly

    Lately, there are many videos on FaceToob and YouBuke telling people how to load 135 film... guess what most of those are plainly wrong. (Search for "load 135 film" and see for yourself!)

    Well, of course you can put the cartridge in the camera first. That means that now you got to pull out film and fiddle it into the take-up spool. Well, since the film is somewhat stiff, and you already set a constraint, things are more complicated from here on, in particular since now the perforations have to be matched to the film sprocket. This way, and this is what you can see on those videos, people make sure that all is fine by cranking some frames just to watch the film exposing and winding on the take-up spool.

    No, I am not going to shoot a video, not yet...

    However, here is how I load a film (assuming the usage of a camera in which the film cartridge goes into the left hand side).
    • hold the (open) camera in the right hand
    • pull out the cartridge axle
    • press the film rewind button for a free-wheeling sprocket
    • hold the film cartridge in the left hand between palm and middle finger, ring finger and pinky
    • hold the film leader with thumb and index finger
    • now you have all the dexterity to smoothly insert the film into the take-up spool's retaining mechanism
    • with the thumb of the right hand, hold the film in the take-up spool's retaining mechanism
    • gently pull the film across the sprocket (it will self align, since it is free) and across the exposure chamber, using your left thumb as a brake
    • gently slide the cartridge into it's place
    • now, hold the camera with your left hand, the thumb still resting on the film, this will ensure no unwanted movement
    • with the right hand, gently push in the cartridge axis
    • with the right hand, very gently (!) crank the film "back", i.e. into the cartridge, in order to straighten out the film - if the film does not slip out of the take-up retention mechanism all is fine
    • now close the camera
    • crank forward 1 frame (which will be partially exposed during the loading) and observe if the backwinding crank moves correctly and the rewind button pops out
    Although the method above seems to involve a lot a steps, with some practice, this is the fastest method to load a roll of 135 film.
    It also is the most economical method, usually it get's me about 40 full-frames and 81 half-frames from 1 shop-bought cartridge. (With the BelOMO Agat 18k this method will result in 82 half-frames).

    I already mentioned one less common camera, the Agat 18k. There are other cameras (in my collections) such as the Argus C3, which may require either taken 'em up-side down of reversing the hands. I tend to just use the other hand...

    Just remember, the cartridge goes in last!

    PS: Wow, I found 1 video explaining film loading the correct way:
    https://www.youtube.com/watch?v=OSoDNrxTWjs
    Congrats to expert village!

    PPS: Unbelievable... the same channel:
    https://www.youtube.com/watch?v=uXKTgaM8HBg
    Oh boy!


    Sunday, June 15, 2014

    Exposure w/o Metering - Part 6

    Today was a mixed bag of light, i.e. very clear and also cloudy skies, in sometimes rapid succession.
    Hence, I went out to photograph the shadows. I was talking about in the last post. What the day did not provide me with, at least not during the time I was hunting shadows, was a full (bright) overcast. Of the 3 promised conditions, we are therefore missing one.

    Down to business. You will see that my subject will not deserve a place in a gallery, however, I believe several effects of bright sunlight versus light overcast can be easily demonstrated.

    The first image refers to shadows cast by unobstructed sunlight. When this short of shadows can be seen, the sunny 16 rule applies, i.e. stop down to f/16, shutter speed = s/ISO.
    hard light (direct sun) casting sharp shadows and a high contrast image

    The second image show sunlight shining through a thin layer of clouds. This is the condition when you want to open up the aperture to f/11.
    soft light (light clouds) washing out the shadows
    You might notice that the upper image has a much warmer overall tone. This is actually created by the dominance of the direct sunlight over the blue-sky ambient light. In the second image, the ambient light starts to take over filling the scene with blue light, hence the colder color tone.

    Another thing to learn here. the total amount of light present in the shadows (in theory) is identical and caused only by the ambient light, i.e. the blue sky. Why did a write in theory? Very simple, in real life reflections, e.g. from buildings, cars, etc., can occur. It is fair to say, I believe, that in the above images, real life meets the theory pretty well.

    For techies under my readers, the following remark. Both shots are taken with the X100S in aperture priority, so that the images are technically correctly exposed. Also, I used RAW files, thereby preventing color temperature correction influencing the outcome.

    Finally, for the f/8 condition, just imagine that there is no shadow cast at all, and all you see is pavement and dirt, even more blue-ish.

    Concluding, to understand the illumination, watch the shadows!

    Exposure w/o Metering - Part 5

    Up to now, I was referring to a clear blue sky and direct sunlit scenes. Can we use the "sunny 16" rule under conditions other than sunny?
    Yes, no problem at all!

    Let's assume that for this discussion, it is mid-day and we are photography a frontlit scene. Also, we don't care about the D.o.F for the time being.

    In full sunlight, as the rule suggest, we are now photographing with an aperture of f/16. This is very hard light, throwing very sharp shadows. Hence, whenever you see very clear and sharp shadows,  you should consider using f/16. BTW, this light would be referred to a hard light.

    With a light cloudy sky, the direct sunlight is somewhat attenuated and the contribution of scattered light increases. Shadows are a bit washed out under such lighting conditions. When I say washed out, I refer to clearly visible, having blurry soft edges. To compensate for this drop in illumination, we need to open up to f/11.

    When the sky is heavily overcast, but still bright, w/o any direct sunlight, the only natural source of illumination is scattered light. Scattered light comes from all direction, hence, no shadows will be present. This lighting condition is referred to as soft light and would require to open up one stop to f/8.

    With a rainy sky, a lot of light is absorbed. I figure it is not necessary to detect this condition by looking at shadows... to me the best indicator of rain is getting wet. The mentioned loss of light due to absorption requires us to yet again open up one stop to arrive at f/5.6.

    Somewhat obvious, in heavy rain, we would yet again open up one stop to f/4. However, I figure it is pretty rare to go out shooting under such weather conditions.

    I hope to be able to shoot some frames showing the different shadows of the first 3 conditions mentioned above. If so, I will show those in a future post.

    Exposure w/o Metering - Part 4

    In the last part, I had a look at the influence of the incident illumination angle. To prevent the post from getting too long, I essentially skip the explanation why that is.
    However, since this is one of the more important things to the sunny 16 rule, I would like to pick up the topic once again.

    The basic principle behind the angle of incident light can be illustrated by the phases of the moon.
    Please have a look, e.g. on this web-page.

    0˚ between illumination and line of sight
    If the sun is directly behind us, and the moon is directly in front of us, that would be full moon. In this phase we all the sunlight shining on the moon.

    ±90˚
    If the sun is on either side of us, this happens during the first and third quarters of the moon, very obviously, we see only half the light illuminating the moon.
    In terms of photography, reducing the amount of illumination by half reflects 1 f-stop. To compensate for this lost stop, we need to open the aperture by one stop, or double the exposure time.

    180˚
    When we are actually looking into the light source, the analogy to the phases of moon starts to become a little weak. The reason for that is, that we can't see any of the sunlight illuminating the moon, still the moon is somewhat visible, due to earth-shine. Earth-shine is the sunlight that the earth reflects, which then illuminates the moon. As I said, this is when the analogy phases out.
    However, we still can learn something about illumination of a scene in photography.
    In earth, we are surrounded by an atmosphere, which itself scatters light. This scattered light is the illumination of a scene shot under backlit conditions. Of course, scattered light is less intense than direct light. To compensate for this, we need to further open the aperture.
    This, of course, only holds true if details of a scene are to be photographed. For a backlit profile photo, the exposure has to be set to match the brightness of the light source, i.e. stopping down the exposure, rather than open it up.


    Saturday, June 14, 2014

    Exposure w/o Metering - Part 3

    In the earlier parts of the series about determining exposure w/o metering, I kept a relatively theoretical approach to the effects of illumination, i.e. luminosity.
    In this post, I will cover another aspect of luminosity, however, this time I will provide some real life examples.

    Previously I wrote about the influence that time and latitude have on the rule "sunny 16". In this post, I will have to make use of the influence that local time.

    For taking the following images, I went out later than 6pm local (MEST), therefore, I opened the aperture by 1 stop to f/11.
    The 3 following photos were taken from the very same spot, with an essentially cloudless sky, and the camera set to s/250 and ISO250. Please observe the shadows to determine the direction of light.

    0˚, f/11, s/250, ISO250, front lit

    90˚, f/8, s/250, ISO250, side lit

    180˚, f/5.6, s/250, ISO250, back lit

    In the last photo, you may notice the lens flair, which was created by shooting into the glaring sun.

    You will notice that the mid-ground (the trees) is perfectly exposed in all three photos. Of course the highlights will be blown out when shooting into the light... no surprise here.

    Comparing the 0˚ and the 90˚ photos, you will notice the balance of the tree's highlights and shadows are the same, while contrast and highlights are more pronounced at the 90˚ shot. At 180˚, the contrast is somewhat "back to normal", when accepting the blown out highlights.
    There is also a noticeable difference in the exposure of the sky. At 0˚, the sky is exposed the darkest. Since the brightness of the sky is independent from the scene, when opening up at 90˚, the sky portion of the image receives more light and is therefore brighter in the photograph. (At this angle, a blue sky can be recovered by use of a polarizing filter, which I will discuss in another post sometime later.)

    Concluding: use the sunny 16 rule when shooting front-lit scenes. Open up 1 stop for side-lit scenes, and 2 stops for back-lit scenes.

    I hope that this brings you a bit closer to understanding exposure and lighting under given circumstances.

    In future parts of this series I will explain how to determine the illumination under circumstances other than an open blue sky.

    Exposure w/o Metering - Part 2

    In part 1, I discussed the rule "sunny 16" and the possibilities opened by variations of the rule according to the use of aperture stops combined with shutter speeds.

    In this part, I would like to introduce the first constraints to the rule, at least what I believe to be the first constraint: time of day (actually, the interweb in pretty silent about this topic) and time of year.

    As mentioned in part 1, sunny 16 applies to mid day, i.e. when the sun is the highest.
    Since today, everything is available world-wide, I would like to add that this statement holds true only to a certain range of geographical latitudes! Actually, my understanding is, that the sunny 16 rule is a rule valid for latitudes between about 30˚ - 60˚ N/S.

    To my understanding, the rule is all about taking pictures of your family during summer vacation. The rule reflects the amount of illumination available to the scene.

    As a physicist, I would like to inform you about the hardness of sun light, i.e. light being collimated, in other words, the light rays are all parallel.
    At a perpendicular angle of incidence, the light rays are closest to one another, meaning the illumination (light yield) is at a maximum.
    At an angle parallel to the incidence of the light, the illumination is minimal.

    Confused?! Take an orange and put it in sunlight. You will observe that the level of illumination drops, dependent on the angle of illumination.

    The same happens on Earth. Dependent on the time of day, the sun will illuminate the earth's surface more or less, that's the influence of the longitude. The same holds for the latitude, although this changes with the time of year.

    I figure, when traveling, one has to adapt the sunny 16 rule according to the latitude and the time of year.

    I would do the following in general:
    • latitudes between 0˚ and 30˚: stop down by one stop
    • latitudes between 60˚ and 90˚: open up by one stop
    • in spring/autumn, between 6:00 and 9:00 local time: open up by one stop
    • in spring/autumn, between 15:00 and 18:00 local time: open up by one stop
     Of course, this needs adaption depending on the longitude.

    Remember, I still talk write about a front-lit scene.
     

    Exposure w/o Metering - Part 1

    This will be a multi-part story about the technique of taking properly manually exposed photographs without the use of any light metering device.

    30+ years ago, I heard about the technique called "sunny 16". However, being relatively young that time, with film being expensive and a heavy burden on my pocket money, I did not dare to use it, in particular since I was mainly shooting color slide film, which demands spot on exposure.
    Consequently, I bough a relatively inexpensive light meter, a "Gossen Bissix 2" which did a great job, I still have it to the present day.
    The light meter was used essentially only to measure the illumination, not the light reflected from the scene, thereby being independent from the color/brightness of the scene itself. Actually, I bought the light meter for exactly that, not sure if I used it ever for metering the scene itself.

    Although the light meter did a great job, it costs additional time to take an accurate meter reading. Some shots were gone before the lighting was determined. To the time of expensive film, I thought "tough luck, no photo now, more luck next time"...

    Today, I do not rely on pocket money any longer, I got my own income now ;-) So I decided to finally buy a camera which is able bring back the good old manual times, Fujifilm's X100S. The X100S is probably the best camera I ever owned, for sure it is the best compact point&shoot available on the market, which is definitely reflected by it's financial resistance, being somewhat a short circuit in the wallet.  Right, today, I could even afford to shoot more film, but where can you buy film today?!

    Back to the topic: the "sunny 16" rule.

    Exposure
    The rule is pretty simple:
    • On a sunny cloudless day,
    • mid day between 9am and 3pm local time,
    • the exposure time is the inverse of the ISO sensitivity
    • at an aperture of f/16
    • when the sun is directly behind the photographer.
    What does that mean? In essence, this is what a light meter does, when used for measuring the illumination of a scene. A light meter, with the diffuser/filter closed, pointed at the sun a mid day on a cloudless day, should read f/16 for 1s/100 with an ISO of 100. In the film days, ISO100 was a pretty normal film to use. A shutter time of s/100, however, did not exist. The closest to s/100 is s/125, which consequently is the shutter speed in this example.

    However, there might be adaptations to this rule, e.g. if you wanted a shallower depth of field. Using an aperture of f/16 creates a very wide D.o.F., which is good for landscape photos, but may ruin a portrait. With a camera of those days, the shortest shutter time was s/1000, which would reflect an aperture of f/5.6 for an exposure equivalent to the example above, creating a shallower depth of field however.

    Depth of Field
    In general, whenever you need to open the aperture by 1 stop, the exposure time needs to be divided by 2.
    • f/16 - s/125
    • f/11 - s/250
    • f/8 - s/500
    • f/5.6 - s/1000
    The above aperture exposure time pair will result in the exact same exposure of the image, however, the depth of field will be very different.

    So far, so good. I will end this post here, w/o any example pics...

    Some of the constraints metioned, I will write about in further parts of this series. I also intend to show examples shot with the X100S with manual settings.

    For now, I would like you to absorb the rule "sunny 16" and the equivalence in exposures.

    Sunday, May 11, 2014

    Focus Peaking on Olympus Digital Cameras

    On the search for a second body for my m4/3 system, I came along some hints on how to simulate focus peaking of Olympus cameras not being provided with said feature.

    Research on the wides of the interwebs revealed that apparently a contract between Sony and Olympus prohibited the latter to include focus peaking on sensors made by the other party... remains to be confirmed actually.

    However, there are clever people out there, which figured out ways of using "focus peaking" with Olympus' cameras. As a straight RAW-shooter, personally I would never been able to come across such a simple solution!

    Olympus added some nifty "art modes" for JPEG images.
    Here is a video making use of one of said filters for pseudo focus peaking: click! Amin explains how an OM-D can be set to perform this function. However, there is one thing I would like to point out, before you follow Amin's instructions, set the camera to MF (manual focus), otherwise, AF (auto focus) will be assigned to the function button.

    When moving towards a slightly different camera, the PEN Mini2 (E-PM2), things change slightly.
    Here is what I did, which should work on most Olympus cameras.
    • put the camera into manual focus - not required when using legacy glass
    • set the camera to record in RAW and low resolution JPEG
    • engage the art mode 11 - "Key Line" (filter 2)
    All you got to do is focus such that black lines will maximize at the intended focus area and snap a shot. Chimping your shot, you will see the artsy stuff only. Don't worry, on the memory card, there will be 2 files, one artsy fartsy JPEG image and a RAW file, the latter containing the image you wanted.

    This is the very famous "filthy apple keyboard" image, used for similar purposes by so many others... Mine is taken with an Olympus PEN E-PM2 and a Cosina COSINON 55mm (@ f/1.4). Have a look:
    Key Line art filter image saved as JPEG

    Filthy Apple Keyboard image saved as RAW
    The art filter enabled, the camera's live view, back screen of EVL, will show the art filter, thereby imitating focus peaking.
    Concerning file sizes, the artsy auxiliary file is 292KB, while the RAW image file is 13.7MB.

    There you have it, focus peaking with the E-PM2.

    Wednesday, May 7, 2014

    Composition and the Impact on Human Vision

    Composition, a very theoretical beast, and boring, or is it?
    Composition of an image can also be the power to determine the behavior of audience. In the movies, that happens all the times.
    Here is a study of a photo I was lucky enough to shoot today.
    Have a look:
    Trees 'n Moon
    I guess, you are not sure what to think of say about about this. And there are reasons for this!

    First, I would like to go into the technicalities of the photo. 
    This was shot at low sun, with a Panasonic Lumix LX7, with a polariser, as a -3/0/+3 Ev HDR at f/4.
    Maybe HDR was not necessary, but, I did it anyway... Since the wind was blowing hard, moving the clouds and shaking the trees, so I had to use a lot anti-ghosting, so much of the image is just the 0 Ev frame anyway.
    There was no cropping involved in post processing!

    Composition and why this image is so tense.

    First "problem", actually I waited for this, is the divided frame. Left and right, clearly different, right through the middle. That is very disturbing!

    The moon is placed in the upper right thirds, that attracts the eye. However, the entire rest of the right side is negative space!

    The trees are placed in the lower third, ending in the lower thirds, opposing the moon. This creates a tension between the the two.

    And now to the most disturbing element of this photo, the element that actually does the trick, the clouds... dominating the entire image and the left half of the frame.


    This is pure hardcore composition... which most wont find appealing in an image...
    Why?
    Ask yourself: Where to look first? Where to look at anyway?!

    Irritating, isn't it?
     

    Ahh, I love photography!

    Explanation of the dilemma:
    => Human vision is attracted to the brightest part, the highest contrast and structure.
     

    Right, there is one place, in this image we are not attracted to, the lower right. Nothing going on here, just empty blue sky...


    The moon sits in the upper right thirds, having high contrast makes it very prominent (rule of thirds). The moon also contrasts strongly to the blue sky.


    But, at the upper left, the brightest spot in the image attracts our senses. Actually, the brightest spot quite on the edge of the frame, which is very disturbing. Some photographers would probably correct that by darkening the brightest part of the clouds.

    Surviving the clouds, just to be caught by the tree's detail... detail and structure, that's what we really like too look at!
     
    And there is our vision, jumping in a triangle not sure what to look at... the moon, the bright clouds, the trees, or the moon?!


    As I said, I love photography.

    And, btw, here is the same scene, a few seconds later, when the clouds were gone.
    Moon n' Trees
    Technically the same photo, although, this is the 0Ev frame only.

    As I said before, there was no cropping in post, neither here, nor above.

    And yes, I did some tricks in post production (GIMP) on the upper image, besides HDR, none of which I did to this photo.

    Composition wise, this photo is also cut in half, but by a diagonal rather than a vertical as we see above. Now there seems a pointy relationship between the moon and the tree, which seems supported by the faint structure visible in the otherwise pretty dull sky.
    In terms of eye-movement, you may find yourself looking from the trees to the moon, crossing the dark diagonal. Once arrived at the moon, which now is the brightest part in the picture, your vision will rest.

    Yes, this second picture is in balance and creates some rest, but, is it as interesting as the other one?


    I am sure my audience is divided as to which of the 2 photos is more appealing, but that was not the point of this post. The point was what composition can do to the observer!


    ps:

    I was too busy with the composition and stuff... so that I actually did not note myself that the clouds form a face, staring at the moon. A dear friend of mine pointed the face out to me...
    And here we have another component, which draws the eye, faces, e.g. the man in the moon.
    Isn't it wonderful how our human brain works... locking on whatever is familiar!
    When editing the photo, I personally did not notice the face at all, since I was so focused on the general lines...
    rules of thirds
    Here's what I see in my image now:
    looky looky ... a face is staring at the moon!
    Now, let's have a look/analysis to/of the image without clouds:
    no clouds!
    The moon and the trees are essentially in the same position as in the image before. However, there is a very different imperative to the image now. First of all, the vertical division is gone, and so is the "face".
    What is left is a moon casting a frame to the trees (green lines), causing a diagonal negative spave (red lines). Incidently, some clouds form arcuate patterns across the sky (blue lines), pulling the image into balance.

    Thanks to Richard for pointing out additional visuals... As I said, I was so busy with the general lines, that I missed the face.


    Thursday, March 27, 2014

    Possibilities of HDR

    Ah, here he goes again... high dynamic range... hated by so many. And yes, I agree, HDR images can look really horrible!
    Besides creating the final image, HDR techniques can be interesting tools to get to an image one was aiming for when shooting.

    Let's start with a normal single frame photo of the scene. This is the middle frame, i.e. the normal exposure image, of my HDR shot:
    Single shot @ -2/3 Ev
    Just in case, here is a link to the photo.
    It was a nice sunny day, contrasts running up pretty good! In such a situation, there is just so much one can do in post processing... saturation in both, the whites and the blacks. A picture essentially unusable. This shot is already 2/3 of a stop under-exposed, but still, the whites blow out. Of course, all the detail inside the depot is lost.

    When using HDR as an intermediate tool, you will try to only compress the dynamic range and leave the rest essentially alone. The result will be a very very bad looking picture, but this is a good thing!
    Have a look at the result of a 3 frames HDR (not cropped, just scaled down):
    3 frames HDR
    Of course, blogger will "improve" this image, so please have a click on the link below.
    LINK!

    No, this was not a mistake, this was made that dull on purpose. Looks pretty odd to, like if there was fog. Fog would create very soft light, but the light is not soft at all, in fact, it is pretty hard, as you see from the sharpness of the shadows.
    However, all of a sudden, in the lights, a tree is visible behind the building. At the same time the trusses inside the depot make an appearance too.

    My picture shows the old tram depot of The Hague with ... old trams! Ideal to shoot an "old" photo.
    Here, HDR can give me all the details, in inside the depot and outside it in bright sunlight.

    Of course, conversion to black and white is the first step in the process.
    The second step is to drop the highlights and raise the shadows, both to personal likings of course.
    As a third step, the whites are driven up, just 'til the first regions saturate, the same with the blacks, of course downwards this time.
    The second and third step is why HDR was used in the first place.

    Optionally, noise reduction and sharpening could now be additional steps in such a workflow.

    The result is a clinically clean black and white image. By far to crisp to be "old". To make a picture old, we need to add grain, as in the good old chemical photography times.
    But, grain is not all, old lenses, I mean really old lenses, showed some distinct vignetting, which has to be added for the effect.
    Actually, before vignetting, I cropped the photo a bit, as to fill the frame. I like the tracks, but not so much the bike stand. The bits of sky are not really adding much either.

    The final image is that:
    Old tram depot The Hague
    And again, you may want to click this link, just in case blogger improved my image again.

    A little bit of self-critique: I might have been a little heavy handed on the vignetting and the sepia color may be a little off. However, all in all, the image came out as envisaged.

    Technical info:
    • Olympus PEN E-PM2
    • Olympus M.Zuiko 14-42mm II @ f/9 f=42mm
    • ISO 200
    • middel image: t=1s/200
    • shot in RAW
    • HDR: -3/0/+3 @ -2/3Ev

    Saturday, February 1, 2014

    Add Texture to Your Photos

    Here is another little trick to make you photos more interesting. How to add texture to certain parts of a photograph, using the GIMP. This short tutorial is not supposed to demonstrate any particular interesting picture, although one might think the result is kinda artsy.

    Well, lets see what we got. A slightly overdone HDR shot of a beach, with some strange coloring going on in the sky. The sky indicates that during post-processing, the program ran out of color space.
    Have a look:
    Beach HDR, out of color space!
    This shot is hard to fix. Re-doing the post-processing seems the only option. But, what if you don't have the RAW-files?

    Let's try to get some artistic element to the rescue... adding texture!
    This will be the texture to add, a photograph of a wall:
    Pretty boring white wall...
    So, I decided to take a photo of a brick wall which has been painted white, great.

    Lets quickly compare the 2 images. The image of the beach in relatively dark in the lower left corner, while the image of the wall is brightest in the same region. Or, in other words, the upper right of the brick wall's image is darker than the lower left. In a way, those images are complementary.
    Actually, I am not making use of this, but this will be explained later.

    In the GIMP, I opened the image of the beach, as you would do normally anyways. Than, I used "Open as Layers..." to load the image of the wall.
    Now, the only thing you will be able to see is the image of the wall, since this is now the first layer. By default options this layer is in mode "Normal" with an opacity of 100%.

    Click on the layer that represents the wall. This should cause a white frame around the layer's icon. Now select the mode to the option "Multiply".
    The intermediate result will look like this:
    Like projecting a slide on a white wall...
    If you are after an effect like projecting a slide on a wall, this is what you may want to do!
    Note that the left and right lower corners of the image have a similar brightness; this is due to the opposing gradients of the original frames.

    Let's give a further "creative" touch and change the effect of the wall.
    With a layer mask, on the wall, one can add a gradient, which will fade out (or in) the contribution of the textured frame.
    In this example, I use a black gradient from below. Having the following effect on the texture frame:
    wall w/ gradient

    After having applied the gradient to the texture frame, the left-right difference on the lower third is gone, and so is the nice compensating effect...

    This results in a slightly different final image:
    final result


    Mind you, this is not supposed to be fine art. This technique of adding texture, as you might see, is clearly able to distract from the deficiencies, i.e. lack of color space, of the original photo.

    Wednesday, January 29, 2014

    Lunar Photography on the Cheap II (gratis/free)

    Yesterday I showed how to take a lunar shot with a simple point&shoot camera with a 8x zoom lens. Of course, the trick was that this inexpensive camera is able to shoot in RAW (thanks to CHDK).

    Towards the end of the post, I mentioned that I used commercial software, i.e. Photomatix, to deal with the "develop" part of things. Further I stated that this process would potentially be possible with "free" software.

    Today, I gave it a try with Luminance HDR (version 2.3.1), which is free software, to my knowledge.


    Preparation

    Luminance HDR asks for bracketed frames. Well, with my single shot, I only got one frame. So I used a very common HDR trick, namely creating more frames, differently "exposed" by software. Mind you, I am shooting DNG (digital negative).
    Here is how this trick is done (with is free software by know):
    • open the shot in Rawtherapee
    • go to the EXPOSURE menu
    • click on 'Neutral' (this should bring everything to default values)
    • export the image using TIFF-16bit (this is your 0Ev shot)
    • drop the exposure to -2Ev
    • export the image using TIFF-16bit (this is obviously your -2Ev shot)
    • raise the exposure to +2Ev
    • export the image using TIFF-16bit (this is obviously your +2Ev shot)
    Done! You now got 3 frames of identical size and format with different exposure values. That's what HDR-software likes!

    The first results in Luminance HDR were not that great. Actually, they were so bad (a lot of grain and noise, over-exposed bits and what not), that I decided not to show those. The software is not easy to use, so I will give it a second try (see below).


    Gratis

    There is another bit of HDR-software available "for free", i.e. gratis. So we are not dealing with free software here, however, one can use this program without paying for a license.
    The program is called FDRTools Basic.

    Having loaded the 3 frames into FDRTools, the results were better, but not really satisfying yet. It appeared that the +2Ev frame was not serving any reasonable purpose, hence, I excluded this frame from the process (this is a very nice feature of FDRTools, it is like making invisible a layer in GIMP).
    And guess what, the result was instantaneously much better than yesterday's Photomatix results!
    Here is the re-sized output, converted into PNG:
    2 frames pseudo HDR using FDRTools Basic


    To me, that was a stunning result, coming from gratis software! A lot less noise than in yesterday's attempt.

    Still, this photo could be slightly improved in GIMP, using the masking technique I explained in the previous post, i.e. the sky was treated with 'wavelet denoise' and the moon with 'wavelet sharpen'.
    after GIMP
    In the original 16 Megapixels image, the difference is somewhat visible. The above shown scaled down versions look almost identical to me.


    Free

    And here is the promised text about the entirely free solution.
    Learned from my experience with FDRTools, I only loaded the -2Ev and the 0Ev frame into Luminance HDR. So for so good, but now the hard part.
    Luminance HDR offers a lot of different algorithms to combine the frames. I went for "Profile 1".
    Luminance HDR offers even more algorithms to tone-map the image. And this is where it went wrong in the earlier attempts. Having tried all different options, I selected "Reinhard '02", pulled 'Key Value' to 0.01 (none of the other tone-mapping parameters have any effect at this stage). In order to darken the image, I use the 'Adjust Levels' histograms. And voilà, we got a presentable result created by free software.
    2 frames pseudo HDR using Luminance HDR
    There is still more noise in the image than in the image created by FDRTools. Again, this calls for the GIMP.
    Here we go, same technique as described previously... and here is the result:
    denoise / sharpen by the GIMP
    Yep, the differences are getting really subtle now, which of course speaks for the use of free software!

    I hope you enjoyed this little journey from commercial to gratis to free. Personally, I am not sure if gratis or free won the contest. But certainly commercial produced the least favorable result in this particular case. But than, using software of this nature is somewhat of an unfair abuse, isn't it?

    Tuesday, January 28, 2014

    Lunar Photography on the Cheap

    Well, this is not the usual thing I would do. However, since those things are possible, I will show 'em to you... and also explain how I did it.

    First of all, when doing astro-photography, I would usually use a decent telescope, e.g. an APO refractor w/ a fluorite-glass lens... or a decent reflector with some decent optics.

    However, today, I show you how you can achieve an acceptable shot of the moon, using an inexpensive Canon P&S (point 'n shoot). I my case, it is my trusty IXUS 140 (ELPH 130). Of course, we need to use CHDK in order to shoot in RAW.

    The shot was taken in the blue hour (aka. magic hour or golden hour). According to the exif data, the shot was taken at f/6.9, 1/125s, 40.0mm, ISO400 (date: 10.01.2014 @ 16:40).

    Here is what the camera though I was aiming for (jpeg done by the camera, in the hope that blogger does not tweak the image too much):
    JPEG as recorded by the camera, scaled and saved as PNG

    The same shot, recorded in RAW (DNG) by CHDK, was taken into Photomatix and the GIMP with the following steps performed on the image.

    Photomatix:
    • playing with single frame pseudo HDR parameters (tone mapping)
    • tweaking highlights and shadows
    • dropping exposure by some stops
    • increasing contrast
    • etc. 
    Actually, for the fun of it, this is the image before I used the GIMP:
    as exported from Photomatix, no noise-reduction yet
    The GIMP:
    • duplicating the image, creating a second layer
    • creating a layer mask for the first layer (100% opacity)
    • masking out the moon (the first layer now contains clouds only!)
    • reducing the noise in the clouds using wavelet denoise
    • on the lower layer (luna!), increasing sharpness using wavelet sharpen
    • flatten the image
    • export to PNG
    the result of the process laid out above

    Yep, this is the same shot... compare the cloud pattern...
    After some tweaks, the daylight shot looks like a night-time photo. Also, some detail (noise!) was added to the moon, while noise (detail) was removed from the clouds selectively.

    Here you have it, it does not take pro-gear to create a cool(ish) shot of the moon. I happen to have access to Photomatix, however, I feel that you might be able to use some free software to obtain the same effect... maybe even the GIMP!

    In comparison, on screen, you might like the image before GIMP better... however, I believe on a print, the GIMPed shot might have an edge.

    Tweak your photos and enjoy!

    Thursday, December 19, 2013

    Using C1 for HDR

    Short note using the custom settings dial position(s) of the Panasonic DMC-LX7 for HDR.

    If you search the internet about the C1 and C2 custom settings position, folks seem to advice to setup those memories using the P mode. Not sure why that is, maybe those folks believe that the P stands for "programming"... Well it does not, it stands for "Program AE", which is a mode that automatically selects the shutter speed and the aperture value. This mode allows for a little bit more user control over the camera's settings, e.g. ISO, in comparison to the iA auto mode. That's all there is to P.

    For my HDR purposes, I actually configured the camera to my likings in A mode, the mode used for exposure bracketing, and saved those setting into C1. Why C1? Very simple, C2 has got 3 sub-modes, which the user needs to select via a menu. Anything under C2 is therefore not directly selectable.


    Here are some of the settings (non exhaustive list) I use and why I use those:

    AUTO ISO / max ISO 400
    In the very beginning I used max ISO 80, which is fine in pure daylight. However, if you allow AUTO ISO, this is what the camera will selected anyway (watch you ND-filter). Under low light, ISO 400 still produces reasonably low noise +3EVframes with handheld-compatible shutter speeds.
    Don't go any higher however! My experience is that the camera will select ISO 80-160 for the 0EV and ISO 80 for the -3EV shot.

    Stabilizer OFF
    Well, I love the stabilizer for single frame shots, in particular in lower light and/or longer lenses. However, the O.I.S. (Optical Image Stabilizer) uses a mobile doublet, see image below, which will cause tiny changes to the image geometry.
    There is nothing wrong with tiny changes in image geometry, unless you want to match image coordinates from different frames.
    Consequently, I want OIS always engage, unless I am taking bracketed frames for HDR.

    FN button to "Quality"
    This might look funny since you would consider to shoot in RAW only. That is entirely true, however, occasionally it comes along handy to also have a JPG recorded. The LX7 is able to record a JPG file next to the RAW file. The content of this JPG file is actually configurable in the camera itself, even camera effects will have influence on this file. A push on the FN button now allows for a quick decision to include or not said JPG file.