Showing posts with label color temperature. Show all posts

Sunday, July 21, 2019

China Ball studio light

Lately some brainstorming with a friend lead us to improvise portable China Ball lighting for a small vlogging setup on the cheap, after having discussed the use of lighting stands and soft-boxes.

The basic idea is to use materials as inexpensive and in-obstructive as possible. While hanging China Balls might be the obvious choice, however, this means that the lighting setup is not really portable.
We came to the conclusion that a suitable floor lamp would be able to hold a China Ball in a decent height, enough for a desk to be illuminated with a soft key light.
A first choice fell on an IKEA product called NOT.

The next problem to be solved was to mount a China ball to the lamp, such that the light source is essentially in the center of the ball, while the ball remains easily removable.
Household grade China balls are usually hung with little eyes on hooks.
Collapsed China Ball as seen from top, note the eyes to the right and the left
Having a ball mounted on a stand, it needs to be mounted upside down.

Your regular household China ball comes with a steel wire frame to suspend the ball from the electrical wire. This employs some sort of clamping mechanism. With a little bit of pliers work, this clamp can be re-purposed as a lower stabilizer. Have a look:


Only one of the two arms is used, the other is bent out of the way

This is how the frame engages with the post of the floor lamp

The frame of a China ball is created by welding two rods together. This creates a very small lip in the middle of the frame. Here this lip is arranged to abut with the metal cone of the lamp housing.
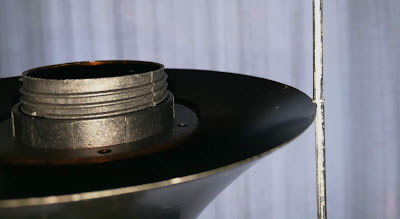
Weld of the frame rests on housing cone
To fix it all, gaffers' tape can be used. For better visibility, white gaffers' tape is used for demonstration.


Needless to say that in this setup, the China Ball is mounted from the top and clipped in to the little hooks on the lower end of the frame (*).

Top of the China Ball


Gravity holds the lower end down.

Bottom of the China Ball


In this example, a 90cm China Ball was used. Seen the flimsy wire holding it all up, a somewhat lighter, i.e. smaller, ball should be used. Inside the ball, there is a TRADFRI bulb installed. For the following photo, the color temperature of the bulb was set to warm in order to form a contrast to the bright blue sky shining through the curtains.

NOT and TRADFRI standing China Ball

(*) Clipping the hooks into the eyes creates tension in the frame and slightly deforms the frame. By doing so, the stability of the frame is compromised. During the first attempt, the ball was clipped to the frame. It turned out to not only be unnecessary, but also detrimental to the setup.

Just as a final remark, NOT, as it comes, provides a maximum height. Using less segments will provide a lower light height. Using more segments, e.g. from a second NOT, could increase the height. The latter option should be taken with great care to stability of the stand. Maybe adding some weight on the food for added stability.

Friday, December 25, 2015

Cinematic Photography (night)

Cinematic Photography is an expression that I came across lately. Another name for the same genre seems to be "Hollywood Look".

There is a difference in tone rendering between photography and cinematography, no doubt. However, a certain flavour of street photography, in particular during night time, adopted the Hollywood cinematography look.
To my surprise, it is very effective, and very simple to do.

Before learning about the "Hollywood Look", I just enjoyed watching Hollywood movies once in a a while. Now that I am aware what the effective colour composition used for the Hollywood look is, I am surprised to find it all over the place, e.g. in commercials.

Now, what is so particular about that "look"?

The basic concept seems to be to create a background in complementary colours of the foreground. The foreground will therefore be dominant over the background.

Movies usually tell stories about humans. Those typically have an orange skin tone. So, in order to put an emphasis on the "subject", i.e. the actor, one would tone the actor in the scene in an orange like hue. To make the actor pop, the background would now be toned in the complementary colour, i.e. turquoise.

With that knowledge, watch a Hollywood movie! You will notice, there is a strong preference to orange tones, accompanied by blueish and/or greenish backgrounds.

The Hollywood Look follows a really basic compositional principle that warm colours attract, while cold colours repel (fore- and background).

Let's have a look on a simple photography

Nathan Phillips Square, Toronto

The very same photography, with a Hollywood look applied

Cinematic look

So, what did I do to achieve this look?
First of all, this applies to nighttime images. Nothing I will tell you here will look good in daytime pics!

To achieve the look, I used 3 steps, which only concerned colour temperature.
  1. Graduated filter from the top, decreased colour temperature (getting some blue)
  2. Graduated filter from the bottom, adjusted tint to green
  3. Broad radial filter, warm up colour temperature
The above filters can be stored as presets.
I advice to store the radial filter within the above mentioned presets. 
Now, having applied a preset, the radial (orange) filter can be used as a spotlight, to determine the area to be highlighted.

Concluding, it seems that a rather blue upper portion, a greenish lower portion and a foreground mid-portion having orange tint, define the look of movies.
Very often, the blue is ignored and replaced by turquoise produced by the original process.