Friday, November 14, 2014

Fujifilm X100S Outfit Complete

The X100S has developed into my favorite camera, next to the Lumix LX7. This post is all about the X100S. Coming from mechanical SLRs, the silence of the leaf shutters is really pleasant. In a later post, I will write about film cameras with leaf shutters. The X100S, in addition to the super silent shutter, adds all the manual controls I am used to from my purely mechanical cameras.

For the camera to be useful beyond street photography, some additional accessories could come useful.

Portraiture Lens

The 63 degrees field of view, equivalent to a 35mm lens, is pretty ideal for photojournalism, showing the scene around the subject, slightly enlarging the center of the image, where the subject would be placed.
In portraiture, a slight distortion of the image center leads to unwanted effects, e.g. big noses and things of similar nature. Also, in portraiture, one actually does not want to show any of the surrounding scenery. Usually lenses between 90mm and 120mm (full frame equivalent) would do the trick.
The X100S, however, is stuck with a single lens.
To the rescue, Fuji provides 2 auxiliary lenses for the X100/X100S/X100T, a wide angle converter and a telephoto converter. For obvious reasons, the wide angle converter will not help for portraiture.
So, the telephoto converter (Fuji TCL-X100), is what we need to look at.
The TCL-X100 will result in an equivalent "normal" 50mm field of view. Although not ideal for studio portraiture, this is a starting point for taking portraits.

Off Camera Flash

The built-in flash is nice to have, however, it creates really harsh light and needs to be gelled (scotch tape) to diffuse and warm up the light a little.
Fuji offers 3 external flash units, one is ridiculously large, the second one provides a forward angle only, while the third and cheapest option (Fujifilm EF-20) can be pointed upwards in several angles. Still, even this flash would be sitting right on top of the camera.
Whichever option one choses, to get the flash off camera, one might use a flash remote cable. The contacts on Fujifilm's cameras' hot-shoes are similar to Canon cameras' hot-shoes. And in fact, Canon compatible flash cable work just fine with Fuji flashes, TTL and all.

There is a second option for off camera flash: RF (radio) remote triggers, my favorites! Note that radio triggers only work with manual flash settings.
Personally, I tested 2 different brands, both very inexpensive:
  1. WANSEN WS-603C
  2. YONGNUO RF-603C
The YONGNUO got 4+1 contacts in the hot-show (4 plus ground), while the WANSEN got 6+1 contacts.
The YONGNUO units have no problems to fire the Fuji flash, while the WANSEN units struggle. I figure that's got something to do with the Fuji flash's 4th contact, which is blanked out by the YONGNUO remote triggers. Actually, it turned out that one of the WANSEN units was bad, i.e. not popping the flash, whilst otherwise behaving normally.
My recommendation is still towards the YONGNUO RF-603C!

Filter Holder & Lens Hood

Yeah, I know, filters are for wimps! However, here comes your favorite camera, the lens of which cannot be exchanged... maybe here´s a reason to add a useless UV-filter, just to protect the front element of the non-exchangeable lens of your very favorite camera... makes sense?
Of course, you can get the Fuji-thing for about 80 Euros... or, you fetch one of the very cheap after-markets part (LA-49 X100). And screw on your favorite useless UV-filter!

Filters

However useless the protective UV filter is, there are some filters really useful to the X100S.
With a "circular polarizer" (which has actually nothing to do with circular polarization!), one can adjust for polarized light, such as reflections and polarization of the sky.
My X100S bag also holds a filter that is primarily used for astro-photography, a so called "sky glow filter". This filter blocks spectral lines of man made light sources, thereby enhancing starlight. Filters of this kind come for 2" eyepieces, which is in the same ballpark as the X100S filter holder. A small piece of tape interfaces between the filter and the lens' filter thread. There are more extreme filters, e.g. for hydrogen and oxygen lines, however, this would be taking it to the extremes.

Tripod

A decent tripod should be in any serious photographer's bag!
Full size tripods require some space, which the usual bag does not offer, hence, I went for the MeFoto DayTrip. For a price of next to nothing, you'll get a very sturdy, not too tall, tripod.

A Strap

Probably the last thing anyone would be concerned with is the strap used to hold the camera. What I am concerned, the strap should be the first consideration someone should half, after buying a camera.
My preference goes clearly towards the cross-body-style Black Rapid Strap and clones thereof.
I held SLRs, DSLRs and other cameras, including the X100S that way, ready to shoot in an instance! Very cool!

Cable Shutter Release

While this sound really outdated, the X100(S/T) sports a thread for a mechanical shutter release cable. Great stuff with an oldschool camera such as the X100(S/T). Great for really long exposures. That brings us back to the filters, in particular the ones used for astronomy.

Batteries and Charger

Digital cameras run on batteries, and batteries run empty occasionally. So, the more batteries available, the better. However, at some stage, batteries need to be recharged.
Again, the after market offers a really nice deal. PATONA offers a charger for multiple power sources, including 2 batteries for a very competitive price. The charger itself allows for charging from mains, USB or 12V (car) power sources, all necessary cables included! Not much more to wish for, I figure.

The Bag

Finally! I mentioned "the bag" sometimes, previously, and this is it:
The Urban Photo Sling 150 by LowePro.


The Entire Outfit

all items shown fit in the bag shown, actually, I forgot the cable shutter release....

Thursday, November 13, 2014

WANSEN WS-603C mod

The RF trigger transceivers made by WANSEN do a pretty good job. I use those in my Canon digital gear.
However, next to the digital stuff, I also shooting film. The cameras I use for this might have a hot-shoe... at max.
Wanna doe wireless with random and oldskool gear?
Here is the solution: get some WANSEN WS-603C an modify those. No, this is not my idea, I found this guy who modified a Yongnuo RF-603N trigger system this way. Here's another chap showing a modification of a RF-603C in video.

The mod add 3V via a 100kOhms resistor to a pin of a multipole hot-shoe. The 100kOhms resistor would be called a "pulled up", i.e. pulling up the potential w/o adding the current. A very safe bet for any electronics.

The WANSEN units seem to be slightly different from the Yongnuo units. So, take care to modify your RF trigger in an appropriate way. Actually, within different WANSEN units, the wiring is different!
I have to say, that my mod is pretty tolerant to various layouts of the main PCB, since it is oriented on the PCB assigned to the hot-shoe.

the pin on the hot-shoe sensing the presence of a camera

here the pin ends, in the middle!
One can attach the switchable pull-up on either the hot-shoe, or the main PCB.
For reduced confusion, I decided to apply the pull-up to the hot-shoe.
Looking out for "done work", I decided to remove the 3.5mm trigger socket, to make place for a switch. One of the terminals of said switch came conveniently close to the hot-shoe's PCB's solder patch for the relevant pin. A very short piece of wire connects the switch with pin, enabling "pull-up".
The green arrow of the following picture indicates the location of the added pull-up resistor.
the mod asks for a 100kOhms pull-up resistor (connected to the battery terminal)
The unit functions as a flash-trigger now... that's the supposed primary use.
Many modern cameras require their very own speed-light systems. Modifying existent systems, such as the WANSEN or Yongnuo, may not provide TTL metering, however, those system form a perfect alternative to the overpriced PocketWizzards.


Actually, I use those trigger to pop a remote flash with an AGAT 18k.

receive mode, all three
device in the middle set to transmit (cf. green LEDs)


Beneficially, the WANSEN and the Yongnuo system are fully compatible in terms of functions.
Personally, I got 2 Yongnuo units and 4 WANSEN units...I will have a hard time figuring out how I can use 5 speedlites....


Thursday, October 30, 2014

C-Mount Lenses for MFT Cameras

This topic can be found online all over the place. Cheap and cheerful C-mount video lenses on micro-4/3 (MFT) systems. In particular BMPCC users seem t love those lenses.
Some months ago, I bought my first C-mount lens, a 25mm f/1.4, which was fun to play with for a day, but quickly found its way in the bag to stay there.

Recently, I came across 2 more lenses which caught my attention, ad 16mm f/1.6 and a 35mm f/1.7.

Here is a photo of my C-mount lenses, the MFT adapter and 2 macro-rings, which came with the 35mm lens.
16mm, 25mm and 35mm lenses, respective adapter and macro-rings

The 35mm Fujian immediately became my favorite. The 70mm equivalent fast glass makes a beautiful portrait lens! At f/1.7, the aperture is perfectly round, creating wonderful Bokeh-balls. Down to f/4, the aperture stay reasonably round. At f/5.6 a slight zig-zagy-ness crawls in, which stay down to f/16, which is the official end of the scale. However, the lens can be stopped down further, with the aperture getting more and more rectangular.
The adaptation of the Fujian, using the adapter ring shown above, was no problem at all. Actually, the moves beyond the infinity focus.

The 25mm I did discuss previously on this blog, so I will skip this particular lens here.

Finally, the 16mm Cosmicar... Honestly, I had my issues with this lens!
It is clearly visible from the image above, the Comsicar is the biggest of them all. Not sure why the lens was build that way, since the front-element is hidden deeply inside the huge lens-hood.
Using the shown adapter, the Cosmicar could be focused on extremely proximate objects only, meaning, it did not screw all the way into the adapter, I figure.
At this point in time, I thought I just wasted €20, made my peace with it a put the lens aside.
For an unapparent reason, I picked the thing up again and had a look if it could not be modified (to serve whatever purpose... e.g. put in front of a webcam, for long-exposure astro-stuff.
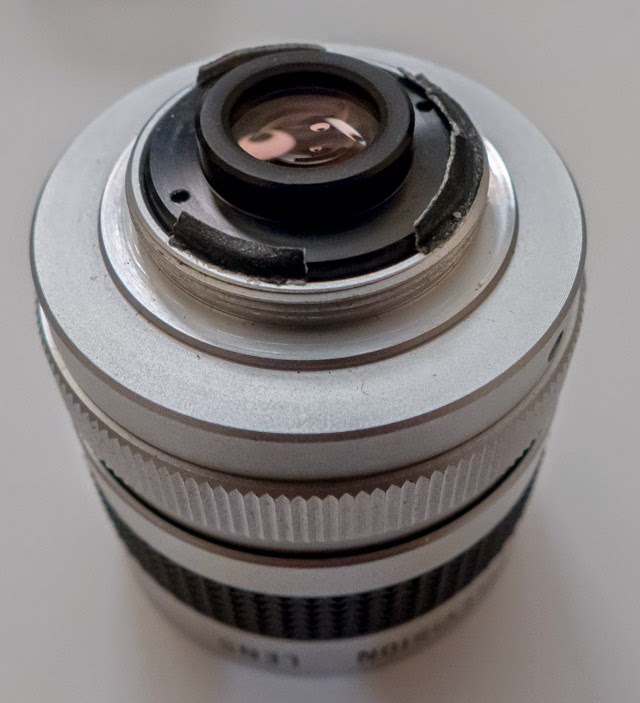
When looking at the back of the lens, it seems that the rear lens group can be unscrewed. There is not actual image of the unscrewed lens group, sorry! The process of unscrewing the group took a long way, which gave me the idea, that the group could be fixed at a place where the lens would focus on my MFT sensor. After some trial and error, I found the infinity focus position.
For the time being, said infinity focus position is fixed by small stripes of gaffer's tape stuffed in the threads.
Cosmicar 16mm f/1.6 with displaced rear lens group
Of course, I could have dropped in a bit of Loctite, to secure the position... however, I am not yet sure if I want things to be like this, hence, I decided for a temporary solution.
Optically, and in terms of handling, the lens is fine. The equivalent 32mm are too short for comfort, however. The lens shows black vignetting, indicating that the image is too small for the sensor.
Olympus added a "digital tele-converter" function to their E-PM2, which I used for the tests. Here, the lens displays a decently flat image over the entire frame. When shooting in RAW, this does not help at all, in contrast to shooting video.
The Cosmicar being a very smooth lens what controls are concerned, will probably be the best of the bunch for video work, provided Olympus' digital tele-converter is used.
For use with the BMPCC, which is provided with a smaller sensor, this lens my just be the hero... the 20 bucks hero that is.

Poppy-Uppy Flash Mini Soft Box

Lately, I have been asked by some friends, why the flash of their compact camera creates such "crappy" images. Assuming that the problem was flat images with lots of hard shadows and a cold color cast, my answer was always the same: the tiny built-in flash-tube create really hard light.
Hard light, i.e. light that comes from a light source being (much) smaller than the subject, creates a flat appearance and pretty harsh shadows in the background.
Using the built-in, is therefore only good for "fill flash" when shooting in bright (sun) back light.

There are a very simple solutions to make most of the flashes useable, even with the tiny flash being the only light source.
  1. diffuse the flash
  2. redirect the flash
  3. tone the flash
  4. redirect the flash with a tone
Options 1 and 2 are obviously referring to making the light softer, which cannot be corrected in post processing, while options 3 and 4 are just an added bonus, and can be added in post.

Options 1, 2 and 4 can easily be achieved by a very simple device... a translucent film canister.

the translucent canister

One simply has to create a template of the cross-section of the poppy-uppy flash's footprint and create a corresponding cut-out in the canister. The cut-out should actually be a bit wider, so that the canister can lean a bit to the front of the camera.
Somewhat like this:

template and modified canister

Going from here, the optional reflector can be created. I experimented a bit with the dimensions of said reflector. And here is my solution:
  • length: 43mm (fitting the canister lengthwise)
  • width: 23mm (creating a 45-ish degree angle)
the internal reflector

The reflector inserted into the "soft box" looks somewhat like this (red side up):

the internal reflector inserted into the soft box

And there are some of the resulting images, showing one of my messy book shelves. The LX7 was on aperture priority f/2.8 @ ISO1600:

reference shot, bare built-in flash
diffuser (no internal reflector)
white side of the internal reflector
red side of the internal reflector
The difference might be hard to see on the given examples, in particular since blogger will "improve" the photos again, I fear.

An assortment of different reflectors, such as different colors, aluminum foil, etc. can make the mini soft box really useful.

Enjoy photography!

UPDATE:
The original design gave a lot of spill towards the back of the camera. To keep this a bit under control, I attached aluminum tape to the inner backside of the canister,  such that is directed more towards the upper front.


Saturday, October 25, 2014

Updated Chardonnol Recipe

Presently, the C41 film is drying.
So far, results look OK, still a little faint though.
I overexposed the film by 2 stops...

Right, here is the recipe:
1/4l Chardonnay
1 tsp ascorbic acid
3/2 tsp soda

I developed for 20 minutes, with agitation ever minute.

As soon as the film is dry, I will scan images and present those here.

Thursday, October 16, 2014

Mechanical Cameras (chemical that is)

Some time ago, I got myself a collection of 4 "untested" (i.e. defect) vintage cameras for real cheap from a world renowned auction site.

The jewel of the collection was a Minolta A5, with a jammed shutter (blocking the film advance lever). I slowly pealed the layers off that thing, and like an onion, it presented the guts, ever so slowly. Finally, I got the lens barrel holding the shutter mechanism separated from the rest. Some tweaking even got the shutter back to work... However, to the present day, I was unable to reassemble this particular camera.
Main problem: I can't get the lens back into the threaded mount. Potentially this camera is a total loss :-(

Second in place was an Argus C3. This camera had a problem with the cocking mechanism, which opened the shutter incidentally. Not good, that for sure. Also the tripod mount was fill with a broken off screw, which is not good either.
The quick fix for the shutter cocking mechanism was to tighten up the shutter release and fix it in the timed position. OK, now, the bulb mode is gone ... but what is a bulb mode good for, if you can't use a tripod? Mind you, the broken screw in the tripod mount.

In third place, a Fujica Half. Actually, this camera was the main driver to place a bid! Again, the shutter was jammed, blocking the film advance lever, similar to the Minolta A5.
Seems that fixes are much simpler with the Fujica. Carefully removing the black rubber, the front-plate of the camera, which is held by 4 screw only, can be easily removed. W/o the front cover, the shutter release mechanism is exposed. Upon wiggling said release a bit, it loosened up and finally released, allowing for cranking the shutter.
The Fujica Half is back in business! Even the automatic exposure stuff seems to work.

The forth and final camera in the bundle was some cassette film plastic thingy not worth any further mention....

At the end, 2 out of 4 cameras a working fine. A third may potentially be rescued, although, I doubt if there is any incentive to rescue this particular Minolta A5 over just trying to get a working one for cheap.

Long live 135 film!

Tuesday, September 2, 2014

Load 135 Film Correctly

Lately, there are many videos on FaceToob and YouBuke telling people how to load 135 film... guess what most of those are plainly wrong. (Search for "load 135 film" and see for yourself!)

Well, of course you can put the cartridge in the camera first. That means that now you got to pull out film and fiddle it into the take-up spool. Well, since the film is somewhat stiff, and you already set a constraint, things are more complicated from here on, in particular since now the perforations have to be matched to the film sprocket. This way, and this is what you can see on those videos, people make sure that all is fine by cranking some frames just to watch the film exposing and winding on the take-up spool.

No, I am not going to shoot a video, not yet...

However, here is how I load a film (assuming the usage of a camera in which the film cartridge goes into the left hand side).
  • hold the (open) camera in the right hand
  • pull out the cartridge axle
  • press the film rewind button for a free-wheeling sprocket
  • hold the film cartridge in the left hand between palm and middle finger, ring finger and pinky
  • hold the film leader with thumb and index finger
  • now you have all the dexterity to smoothly insert the film into the take-up spool's retaining mechanism
  • with the thumb of the right hand, hold the film in the take-up spool's retaining mechanism
  • gently pull the film across the sprocket (it will self align, since it is free) and across the exposure chamber, using your left thumb as a brake
  • gently slide the cartridge into it's place
  • now, hold the camera with your left hand, the thumb still resting on the film, this will ensure no unwanted movement
  • with the right hand, gently push in the cartridge axis
  • with the right hand, very gently (!) crank the film "back", i.e. into the cartridge, in order to straighten out the film - if the film does not slip out of the take-up retention mechanism all is fine
  • now close the camera
  • crank forward 1 frame (which will be partially exposed during the loading) and observe if the backwinding crank moves correctly and the rewind button pops out
Although the method above seems to involve a lot a steps, with some practice, this is the fastest method to load a roll of 135 film.
It also is the most economical method, usually it get's me about 40 full-frames and 81 half-frames from 1 shop-bought cartridge. (With the BelOMO Agat 18k this method will result in 82 half-frames).

I already mentioned one less common camera, the Agat 18k. There are other cameras (in my collections) such as the Argus C3, which may require either taken 'em up-side down of reversing the hands. I tend to just use the other hand...

Just remember, the cartridge goes in last!

PS: Wow, I found 1 video explaining film loading the correct way:
https://www.youtube.com/watch?v=OSoDNrxTWjs
Congrats to expert village!

PPS: Unbelievable... the same channel:
https://www.youtube.com/watch?v=uXKTgaM8HBg
Oh boy!